
Automating a Home Theater with Home Assistant
How I got learned to lose the remote controls and make Home Assistant turn on my home theater with a light switch
tl;dr: a Backups API exists for OPNSense. opnsense-autobackup uses it to make daily backups for you.
A few months ago I set up OPNSense on my home network, to act as a firewall and router. So far it's been great, with a ton of benefits over the eero mesh system I was replacing - static DHCP assignments, pretty local host names via Unbound DNS, greatly increased visibility and monitoring possibilities, and of course manifold security options.
However, it's also become a victim of its own success. It's now so central to the network that if it were to fail, most of the network would go down with it. The firewall rules, VLAN configurations, DNS setup, DHCP etc are all very useful and very endemic - if they go away most of my network services go down: internet access, home automation, NAS, cameras, more.
OPNSense lets you download a backup via the UI; sometimes I remember to do that before making a sketchy change, but I have once wiped out the box without a recent backup, and ended up spending several hours getting things back up again. That was before really embracing things like local DNS and static DHCP assignments, which I now have a bunch of automation and configuration reliant on.
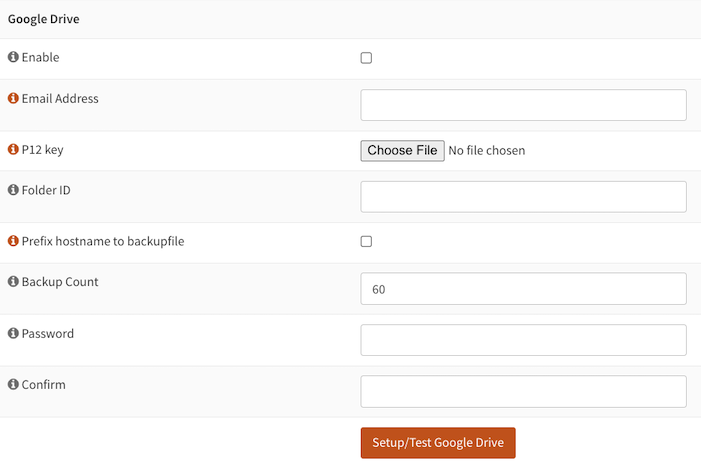
OPNSense has a built-in way to have backups be automatically created and uploaded to a Google Drive folder. Per the docs it does this on a daily basis, uploading a new backup to Google Drive if something changed. If you want to use Google Drive for your backup storage, this is probably the right option for you, but if you want to customize how this works - either the schedule on which backups are made, or where they're sent, there are ways to do that too.
OPNSense provides a simple API that allows you to download the current configuration as an XML file. It gives you the same XML file that you get when you click the "Download configuration" button manually in the OPNSense UI. It's worth downloading it manually once and just skimming through the file in your editor - it's nicely organized and interesting to peruse.
Once you've done that, though, you'll probably want to automate the process so you don't have to remember. That's fairly straightforward:
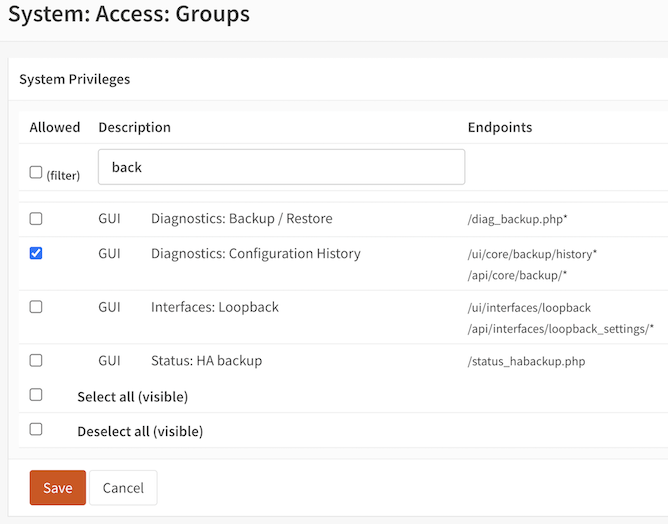
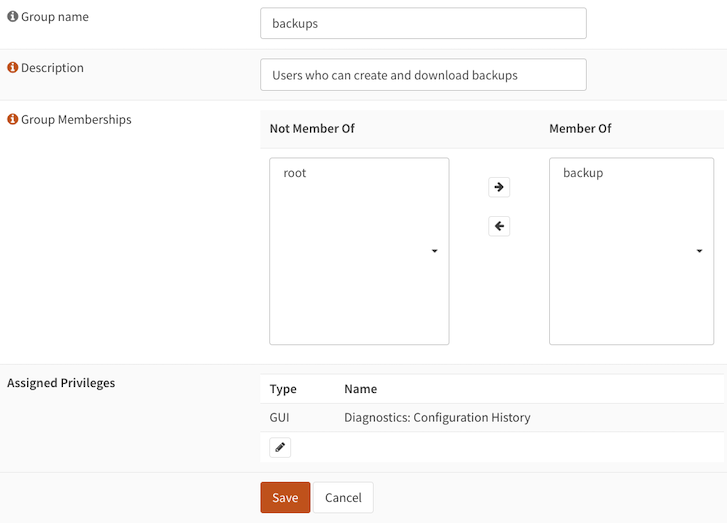
We need to set up a way to access the OPNSense backups API, ideally not using our root user - or indeed any user with more access privileges than necessary to create backups. To accomplish this we'll set up a new Group called backups - create the Group via the OPNSense UI, then edit it to assign the Diagnostics: Configuration History privilege. This grants access to the /api/core/backup/ APIs.
Then, create a new User called backup, and add it to the new backups Group. Your Group configuration will end up looking something like this:
Now that you have a new backup User, which has access only to configuration/backups APIs, you need to generate an API Key and Secret. Do this in the UI (your actual key will be a long random string):

Creating an API Key for the user will automatically initiate a download in your browser of a text file containing 2 lines - the key itself and a secret. This is the one and only time you will be able to gain access to the secret, so save it somewhere. An encrypted version of it will be kept in OPNSense, but you'll never be able to get hold of the non-encrypted version again if you lose it. Here's what the text file will look like:
Let's test out our new user with a curl command to download the current configuration. The -k tells curl to disregard the fact that OPNSense is likely to respond with an SSL certificate curl doesn't recognize (for your home network you are unlikely to care too much about this). The -u sends our new user's API Key and Secret using HTTP Basic auth:
Cool - we have a 56kb file called backup, which ends up looking something like this:
In my case I have a couple of thousand lines of this stuff - you may have more or less. Obviously, we wouldn't usually want to do this via a curl command, especially not one that resulted in our access credentials finding their way into our command line history, so let's make this a little bit better.
There are a variety of options here, on 2 main axes:
In my case I want to put the file into a git repository, along with other network configuration files. OPNSense does have a built-in way to back up files to a git repo, but I want to be able to put more than just OPNSense config files in this repo, so I went for a more extensible approach.
Daily backups seem reasonable here, as well as the option to create them ad-hoc. Ideally one would just run a single script and a timestamped backup would appear in a backups repo. As I recently set up TrueNAS scale on my local network, this seemed a great place to host a schedulable Docker image, so that's what I did.
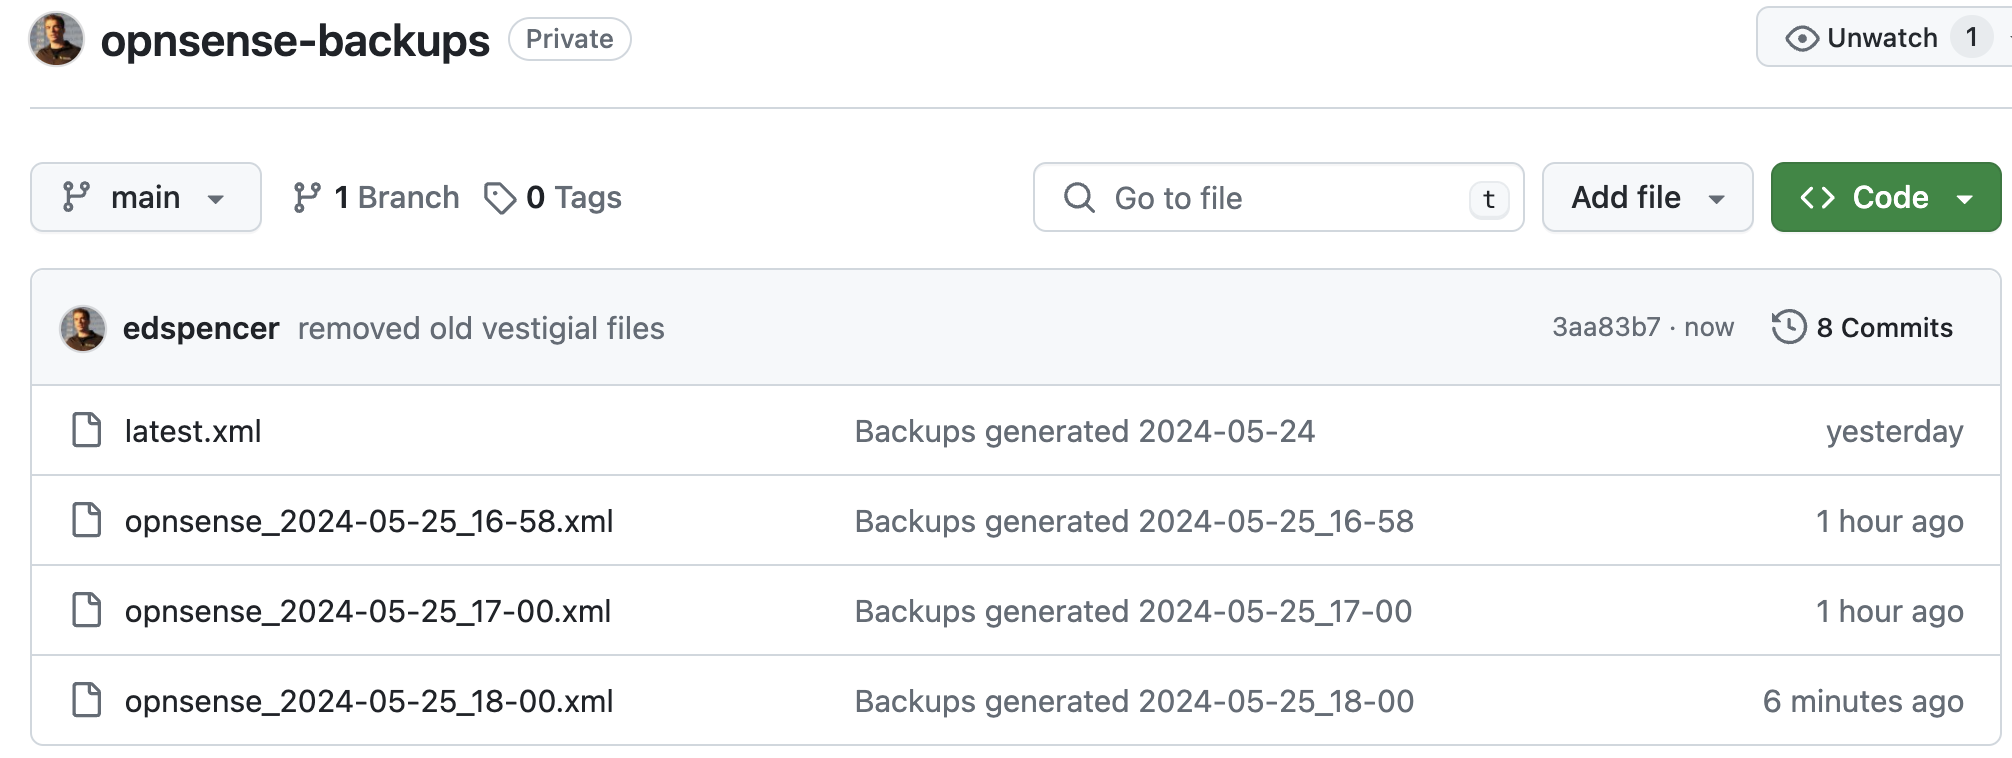
The Docker image in question handles downloading the backups and pushing them to a GitHub repository. This approach allows us to easily schedule and manage our backups using TrueNAS SCALE, or anywhere else on the network you can run a docker container. It's published as edspencer/opnsense-autobackup on Docker Hub, and the source code is up at https://github.com/edspencer/opnsense-autobackup.
Here’s a quick walkthrough on how to set up the Docker container on TrueNAS SCALE and configure it to automate your OPNSense backups.
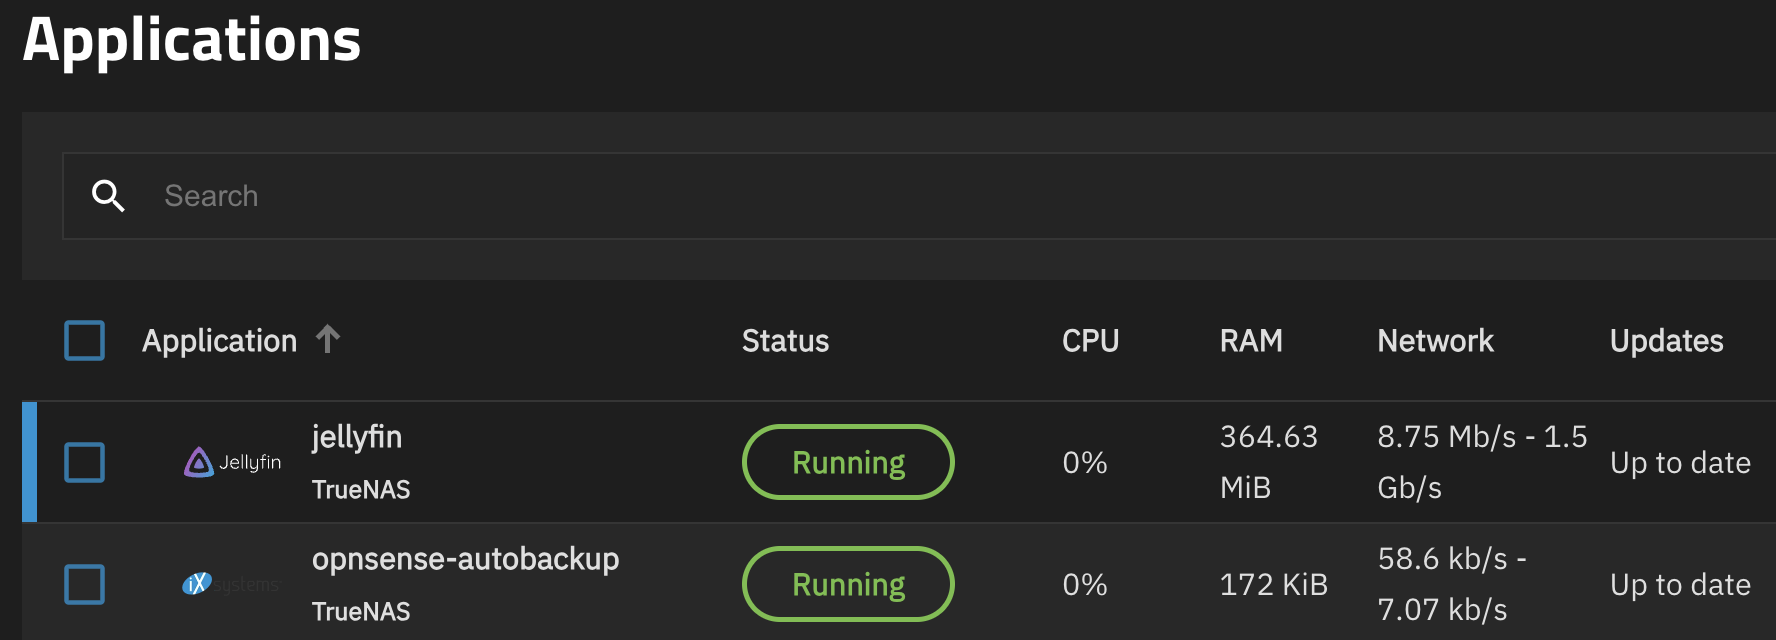
Navigate to the Apps screen on the TrueNAS Scale instance, then click Discover Apps followed by Custom App. Give your app a name and set it to use the edspencer/opnsense-autobackup docker image, using the latest tag.
You'll need to provide the following environment variables, so configure those now in the Container Environment Variables section:
| Name | Value |
|---|---|
| API_KEY | your_opnsense_api_key |
| API_SECRET | your_opnsense_api_secret |
| HOSTNAME | firewall.local |
| GIT_REPO_URL | https://github.com/your_username/your_repo.git |
| GIT_USERNAME | your_git_username |
| GIT_EMAIL | your_git_email |
| GIT_TOKEN | your_git_token |
| CRON_SCHEDULE | 0 0 * * * |
Set the CRON_SCHEDULE to anything you like - this one will make it run every day at midnight UTC. Click Install to finish, and you should see the app up and running. So long as you have created your GitHub repo and PAT, you should already see your first backup files in your repo. Depending on what you set for your CRON_SCHEDULE, you'll see new files automatically appearing as long as the image is running.
And you should see some Docker log output like this:
I feel much safer knowing that OPNSense is now being continually backed up. There are a bunch of other heavily-configured devices on my network that I would like centralized daily backups for - Home Assistant and my managed switch configs being the obvious ones. More to come on those.
Obviously you could run this anywhere, not just in TrueNAS, but I like the simplicity, observability and resource reuse of using the TrueNAS installation I already set up. So far that's working out well, though it use some monitoring and alerting in case it stops working.
For a detailed guide on setting up the Docker container and automating your backups, visit the GitHub repository. The script that actually gets run is super simple, and easily adaptable to your own needs.
How I got learned to lose the remote controls and make Home Assistant turn on my home theater with a light switch