In the past few posts, I've been exploring ways to integrate AI into UI design, especially with React and Next.js. A key project has been Bragdoc, which I've continued to refine over several posts. You can see how it all started in How I built bragdoc.ai in 3 weeks. I've also been experimenting with React Server Components, as detailed in Error handling and retry with React Server Components and Promises across the void: Streaming data with RSC.
I've also tackled how AI can transform content recommendations, laid out in AI Content Recommendations with TypeScript and Introducing InformAI - Easy & Useful AI for React apps. This involves using cutting-edge techniques like Retrieval-Augmented Generation, as explored in Easy RAG for TypeScript and React Apps. These posts reflect my ongoing commitment to pushing the boundaries of what's possible with modern web development technologies.
frameit.dev - fast and free video thumbs, title cards and OG images
As a developer who occasionally creates technical content, I've always found thumbnail creation to be a friction point. I don't have a design background, and I don't want to pay for Photoshop or Canva Pro just to make a few YouTube thumbnails. I'd often spend more time fiddling with graphics software than actually creating the content.
What I wanted was a simple tool that would give me repeatable, correctly-sized and attractive images to use for video thumbnails, title cards, Open Graph images, and the like. I'm a big fan of the excalidraw approach: a simple, client-side app that runs in the browser, does one thing well, and does not require any information from its users.
Enter frameit.dev:

Initially vibe-coded as a way to quickly get a few consistent video titles created, it ended up being useful enough that I've been slowly iterating on it to make it better. The code is all open source, with a hosted version running at frameit.dev.
Revisiting Bragdoc
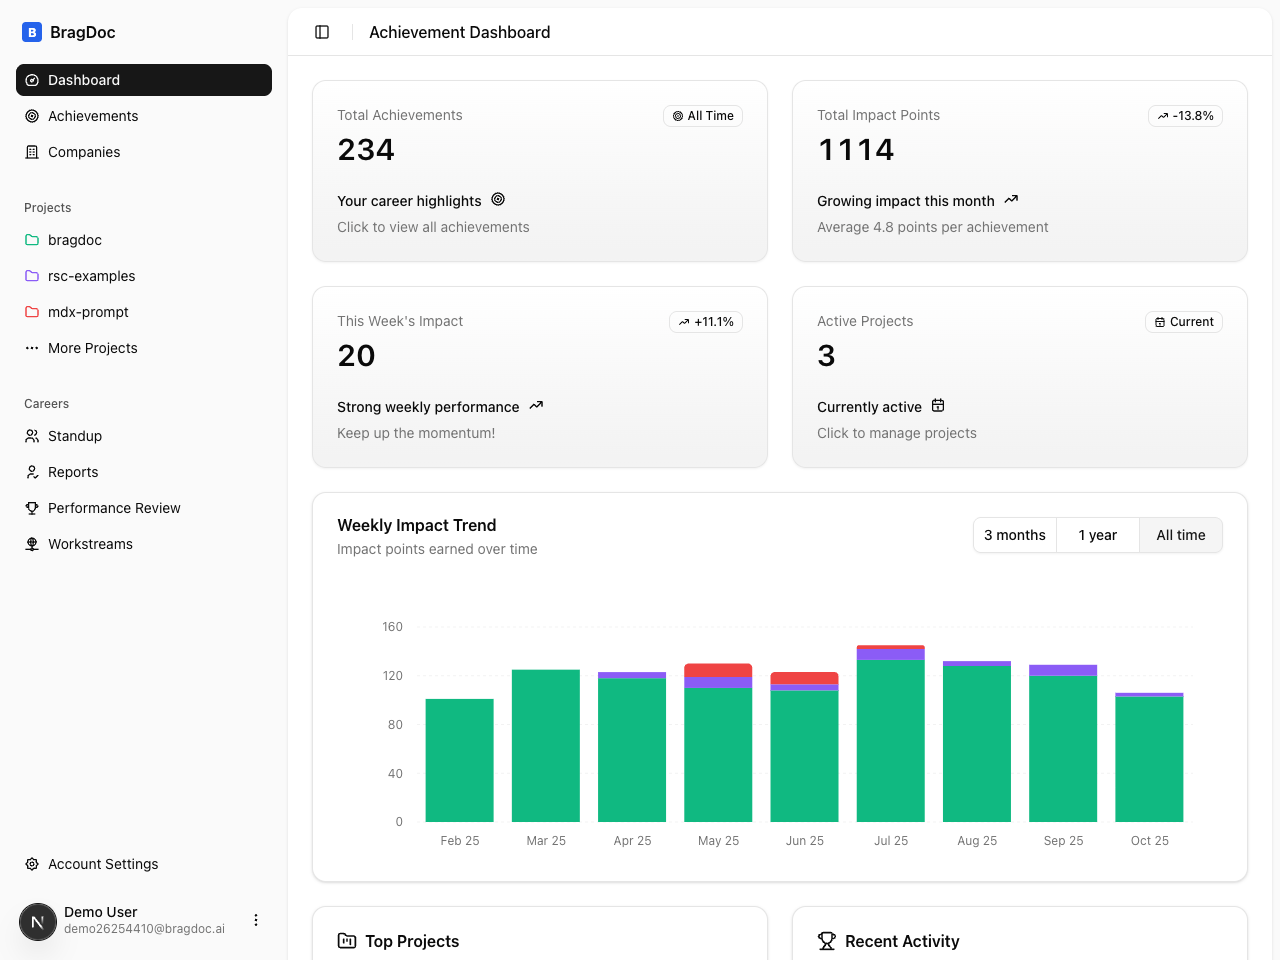
About 9 months ago I launched bragdoc.ai, an AI tool that helps software engineers keep track of their work and turn it into useful documents for performance reviews, weekly updates, and resume sections. I wrote about how I built it in 3 weeks using AI tooling, shipped it, and then... let it sit there while I worked on other things.
But I came back to it recently and gave it a complete overhaul. The core idea remains the same - automatically track your meaningful contributions from git repos and turn them into documents - but pretty much everything else got rebuilt from the ground up.
What changed
The original version worked, but it had some issues. The UI was built around a chatbot interface because, well, that's what the Vercel Chat template gave me and I was moving fast. It worked fine but it always felt a bit clunky for what is fundamentally a data management and document generation problem.
Another issue was privacy. Bragdoc doesn't require you to link to github in any way - most employers wouldn't want some random third party app to have access to their code. Previously, the CLI would extract data from your git repos and send it up to bragdoc.ai's servers, where OpenAI would process it. That's fine for a lot of use cases, but if you're working on proprietary code at a company with strict data policies, it's not so great.
So I rebuilt it with three main goals:
Privacy first: The CLI now sends git data directly to the LLM of your choice, completely bypassing bragdoc.ai's servers. Your code stays on your machine. Always.
Configurable extraction: You get four levels of data extraction to choose from - commit messages only, diff stats, truncated diffs, or full diffs. Pick what makes sense for your privacy requirements and LLM budget.
How I built bragdoc.ai in 3 weeks
As we start 2025, it's never been faster to get a SaaS product off the ground. The frameworks, vendors and tools available make it possible to build in weeks what would have taken months or years even just a couple of years ago.
But it's still a lot.
Even when we start from a base template, we still need to figure out our data model, auth, deployment strategy, testing, email sending/receiving, internationalization, mobile support, GDPR, analytics, LLM evals, validation, UX, and a bunch more things:

This morning I launched bragdoc.ai, an AI tool that tracks the work you do and writes things like weekly updates & performance review documents for you. In previous jobs I would keep an achievements.txt file that theoretically kept track of what I worked on each week so that I could make a good case for myself come review time. Bragdoc scratches my own itch by keeping track of that properly with a chatbot who can also make nice reports for me to share with my manager.
But this article isn't much about bragdoc.ai itself, it's about how a product like it can be built in 3 weeks by a single engineer. The answer is AI tooling, and in particular the Windsurf IDE from Codeium.
In fact, this article could easily have been titled "Use Windsurf or Die". I've been in the fullstack software engineering racket for 20 years, and I've never seen a step-change in productivity like the one heralded by Cursor, Windsurf, Repo Prompt and the like. We're in the first innings of a wave of change in how software is built.
NarratorAI: Trainable AI assistant for Node and React
Every word in every article on this site was, for better or worse, written by me: a real human being. Recently, though, I realized that various pages on the site kinda sucked. Chiefly I'm talking about the Blog home page, tag pages like this one for articles tagged with AI and other places where I could do with some "meta-content".
By meta-content I mean content about content, like the couple of short paragraphs that summarize recent posts for a tag, or the outro text that now appears at the end of each post, along with the automatically generated Read Next recommendations that I added recently using ReadNext.
If you go look at the RSC tag, for example, you'll see a couple of paragraphs that summarize what I've written about regarding React Server Components recently. The list of article excerpts underneath it is a lot more approachable with that high-level summary at the top. Without the intro, the page just feels neglected and incomplete.
But the chances of me remembering to update that intro text every time I write a new post about React Server Components are slim to none. I'll write it once, it'll get out of date, and then it will be about as useful as a chocolate teapot. We need a better way. Ideally one that also lets me play by watching the AI stream automatically generated content before my very eyes:

AI Content Recommendations with TypeScript
In the last post, we used TypeScript to create searchable embeddings for a corpus of text content and integrated it into a chat bot. But chat bots are the tomato ketchup of AI - great as an accompaniment to something else, but not satisfying by themselves. Given that we now have the tools to vectorize our documents and perform semantic searches against them, let's extend that to generate content recommendations for our readers.
At the bottom of each of my blog articles are links to other posts that may be interesting to the reader based on the current article. The lo-fi way this was achieved was to find all the other posts which overlapped on one or more tags and pick the most recent one.
Quite often that works ok, but I'm sure you can think of ways it could pick a sub-optimal next article. Someone who knows the content well could probably pick better suggestions at least some of the time. LLMs are really well-suited to tasks like this, and should in theory have several advantages over human editors (such as not forgetting what I wrote last week).
We want to end up with some simple UI like this, with one or more suggestions for what to read next:

So how do we figure out which content to recommend based on what you're looking at?
Easy RAG for TypeScript and React Apps
This is the first article in a trilogy that will go through the process of extracting content from a large text dataset - my blog in this case - and making it available to an LLM so that users can get answers to their questions without searching through lots of articles along the way.
Part 1 will cover how to process your text documents for easy consumption by an LLM, throw those embeddings into a vector database, and then use that to help answer the user's questions. There are a million articles about this using Python, but I'm principally a TypeScript developer so we'll focus on TS, React and NextJS.
Part 2 covers how to make an AI-driven "What to Read Next" component, which looks at the content of an document (or blog post, in this case) and performs a semantic search through the rest of the content to rank which other posts are most related to this one, and suggest them.
Part 3 will extend this idea by using InformAI to track which articles the user has looked at and attempt to predictively generate suggested content for that user, personalizing the What to Read Next component while keeping the reader completely anonymous to the system.
Let's RAG
About a week ago I released InformAI, which allows you to easily surface the state of your application UI to an LLM in order to help it give more relevant responses to your user. In that intro post I threw InformAI into the blog post itself, which gave me a sort of zero-effort poor man's RAG, as the LLM could see the entire post and allow people to ask questions about it.
That's not really what InformAI is intended for, but it's nice that it works. But what if we want to do this in a more scalable and coherent way? This blog has around 100 articles, often about similar topics. Sometimes, such as when I release open source projects like InformAI, it's one of the only sources of information on the internet about the given topic. You can't ask ChatGPT what InformAI is, but with a couple of tricks we can transparently give ChatGPT access to the answer so that it seems like it magically knows stuff it was never trained on.
Blending Markdown and React components in NextJS
Authoring long-form content like blog posts is a pleasant experience with Markdown as it lets you focus on the content without worrying about the presentation or making the browser happy. Spamming <p> and <div> tags all over the place is a PITA and serves as a distraction from the content you're working on.
However, in a blog like this one, which deals with a lot of React/node/nextjs content, static text and images are limiting. We really want our React components to be live on the page with all of the richness and composability that React and JSX bring - so how do we blend the best of both of these worlds?
MDX: Markdown plus React
MDX is an extension to Markdown that also allows you to import and use React components. It lets you write content like this:
That's rendering an <Aside> component, which is a simple React component I use in some of my posts and looks like this:
That's really cool, and we can basically use any React component(s) we like here. But first let's talk a little about metadata.
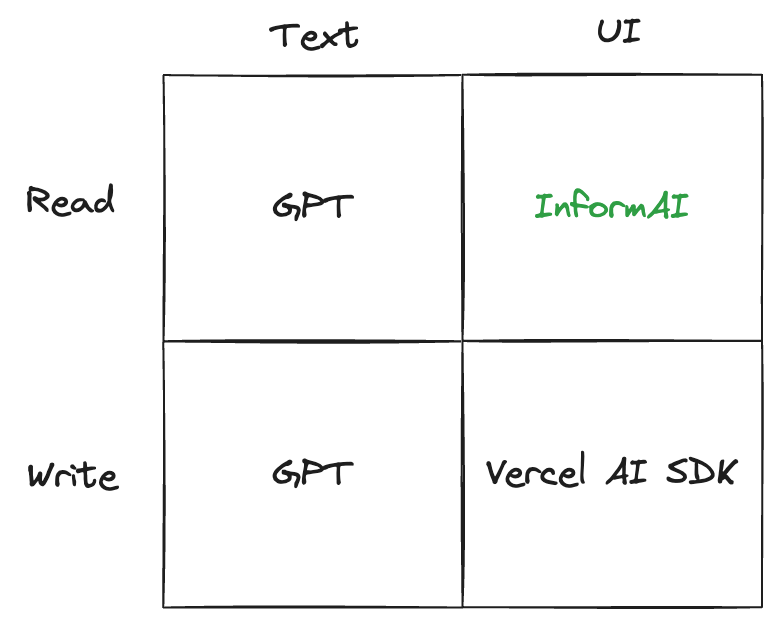
Introducing InformAI - Easy & Useful AI for React apps
Most web applications can benefit from AI features, but adding AI to an existing application can be a daunting prospect. Even a moderate-sized React application can have hundreds of components, spread across dozens of pages. Sure, it's easy to tack a chat bot in the bottom corner, but it won't be useful unless you integrate it with your app's contents.
This is where InformAI comes in. InformAI makes it easy to surface all the information that you already have in your React components to an LLM or other AI agent. With a few lines of React code, your LLM can now see exactly what your user sees, without having to train any models, implement RAG, or any other expensive setup.
InformAI is not an AI itself, it just lets you expose components and UI events via the simple <InformAI /> component. Here's how we might add AI support to a React component that shows a table of a company's firewalls:
Error handling and retry with React Server Components
React Server Components are a game-changer when it comes to building large web applications without sending megabytes of JavaScript to the client. They allow you to render components on the server and stream them to the client, which can significantly improve the performance of your application.
However, React Server Components can throw errors, just like regular React components. In this article, we'll explore how to handle and recover from errors in React Server Components.
Error boundaries
In React, you can use error boundaries to catch errors that occur during rendering, in lifecycle methods, or in constructors of the whole tree below them. An error boundary is a React component that catches JavaScript errors anywhere in its child component tree and logs those errors, displaying a fallback UI instead of crashing the entire application.
To create an error boundary in React, you need to define a component that implements the componentDidCatch lifecycle method. This method is called whenever an error occurs in the component tree below the error boundary.
Promises across the void: Streaming data with RSC
Last week we looked at how React Server Component Payloads work under the covers. Towards the end of that article I mentioned a fascinating thing that you can do with RSC: sending unresolved promises from the server to the client. When I first read that I thought it was a documentation bug, but it's actually quite real (though with some limitations).
Here's a simple example of sending a promise from the server to the client. First, here's our server-rendered component, called SuspensePage in this case:
So we just imported a getData() function that returns a promise that resolves after 1 second. This simulates a call to a database or other asynchronous action. Here's our fake getData() function:
Decoding React Server Component Payloads
If you've spent any time playing with React Server Components, you've probably noticed a bunch of stuff like this at the bottom of your web pages:
You may be wondering what this all means. It's not super well documented, and all pretty bleeding-edge. It's not likely to be something you need to worry about in your day-to-day work, but if you're a curious geek like me, read on.
What you're looking at is a bunch of <script> tags automatically injected into the end of the page. The content above is a copy-paste from just about the most basic Next JS application imaginable. It consists of 2 components - a layout.tsx and a page.tsx:
Teams using Next.js and Vercel have an advantage
During my time at Palo Alto Networks, I spent most of my time working on a product called AutoFocus. It helped cyber security research teams analyze files traversing our firewalls for signs of malware. It was pretty cool, fronted by a large React application, with a bunch of disparate backend services and databases scattered around.
One of the things that was difficult to do was deploy our software. We were on a roughly 3 month release cycle to begin with, which meant several things:
- Out-of-band bug fix releases were expensive
- We didn't get much practice deploying, so when we did, it was a team effort, error prone and took a long time.
- Trying to estimate and scope 3 months of work for a team of 10 is a fool's errand
Deployment meant getting most of the team into a war room, manually uploading build files to various places, doing a sort of canary deploy, seeing if things seemed ok, then rolling out to the rest of the world. Sometimes we decided to roll out architectural changes to reverse proxies and things at the same time, just for fun.
Loading Fast and Slow: async React Server Components and Suspense
When the web was young, HTML pages were served to clients running web browser software that would turn the HTML text response into rendered pixels on the screen. At first these were static HTML files, but then things like PHP and others came along to allow the server to customize the HTML sent to each client.
CSS came along to change the appearance of what got rendered. JavaScript came along to make the page interactive. Suddenly the page was no longer the atomic unit of the web experience: pages could modify themselves right there inside the browser, without the server being in the loop at all.
This was good because the network is slow and less than 100% reliable. It heralded a new golden age for the web. Progressively, less and less of the HTML content was sent to clients as pre-rendered HTML, and more and more was sent as JSON data that the client would render into HTML using JavaScript.
This all required a lot more work to be done on the client, though, which meant the client had to download a lot more JavaScript. Before long we were shipping MEGABYTES of JavaScript down to the web browser, and we lost the speediness we had gained by not reloading the whole page all the time. Page transitions were fast, but the initial load was slow. Megabytes of code shipped to the browser can multiply into hundreds of megabytes of device memory consumed, and not every device is your state of the art Macbook Pro.
Single Page Applications ultimately do the same thing as that old PHP application did - render a bunch of HTML and pass it to the browser to render. The actual rendered output is often a few kilobytes of plain text HTML, but we downloaded, parsed and executed megabytes of JavaScript to generate those few kilobytes of HTML. What if there was a way we could keep the interactivity of a SPA, but only send the HTML that needs to be rendered to the client?
Using Server Actions with Next JS
React and Next.js introduced Server Actions a while back, as a new/old way to call server-side code from the client. In this post, I'll explain what Server Actions are, how they work, and how you can use them in your Next.js applications. We'll look at why they are and are not APIs, why they can make your front end code cleaner, and why they can make your backend code messier.
Everything old is new again
In the beginning, there were <form>s. They had an action, and a method, and when you clicked the submit button, the browser would send a request to the server. The server would then process the request and send back a response, which could be a redirect. The action was the URL of the server endpoint, and the method was usually either GET or POST.
Then came AJAX, and suddenly we could send requests to the server without reloading the page. This was a game-changer, and it opened up a whole new world of possibilities for building web applications. But it also introduced a lot of complexity, as developers had to manage things like network requests, error handling, and loading states. We ended up building React components like this:
This code is fine, but it's a lot of boilerplate for something as simple as submitting a form. It's also not very readable, as the logic for handling the form submission is mixed in with the UI code. Wouldn't it be nice if we could go back to the good old days of <form>s, but without the page reload?
Sencha Con 2013 Wrapup
So another great Sencha Con is over, and I'm left to reflect on everything that went on over the last few days. This time was easily the biggest and best Sencha Con that I've been to, with 800 people in attendance and a very high bar set by the speakers. The organization was excellent, the location fun (even if the bars don't open until 5pm...), and the enthusiasm palpable.
I've made a few posts over the last few days so won't repeat the content here - if you want to see what else happened check these out too:
What I will do though is repeat my invitation to take a look at what we're doing with JavaScript at C3 Energy. I wrote up a quick post about it yesterday and would love to hear from you - whether you're at Sencha Con or not.
Now on to some general thoughts.
Content
There was a large range in the technical difficulty of the content, with perhaps a slightly stronger skew up the difficulty chain compared to previous events. This is a good thing, though there's probably still room for more advanced content. Having been there before though, I know how hard it is to pitch that right so that everyone enjoys and gets value of out it.
Sencha Con 2013: Ext JS Performance tips
Just as with Jacky's session, I didn't plan on making a separate post about this, but again the content was so good and I ended up taking so many notes that it also warrants its own space. To save myself from early carpal tunnel syndrome I'm going to leave this one in more of a bullet point format.

Ext JS has been getting more flexible with each release. You can do many more things with it these days than you used to be able to, but there has been a performance cost associated with that. In many cases this performance degradation is down to the way the framework is being used, as opposed to a fundamental problem with the framework itself.
There's a whole bunch of things that you can do to dramatically speed up the performance of an app you're not happy with, and Nige "Animal" White took us through them this morning. Here's what I was able to write down in time:
Slow things
Nige identified three of the top causes of sluggish apps, which we'll go through one by one:
- Network latency
- JS execution
- Layout activity
Sencha Con 2013: Fastbook
I didn't plan on writing a post purely on Fastbook, but Jacky's presentation just now was so good I felt it needed one. If you haven't seen Fastbook yet, it is Sencha's answer to the (over reported) comments by Zuckerburg that using HTML5 for Facebook's mobile app was a mistake.

After those comments there was a lot of debate around whether HTML5 is ready for the big time. Plenty of opinions were thrown around, but not all based on evidence. Jacky was curious about why Facebook's old app was so slow, and wondered if he could use the same technologies to achieve a much better result. To say he was successful would be a spectacular understatement - Fastbook absolutely flies.
Performance can be hard to describe in words, so Sencha released this video that demonstrates the HTML5 Fastbook app against the new native Facebook apps. As you can see, not only is the HTML5 version at least as fast and fluid as the native versions, in several cases it's actually significantly better (especially on Android).
Sencha Con 2013 Day 1
Sencha Con 2013 kicked off today, with some stunning improvements demoed across the product set. I'm attending as an audience member for the first time so thought I'd share how things look from the cheap seats.
Keynote
The keynote was very well put together, with none of the AV issues that plagued us last year (maybe they seemed worse from behind the curtain!). It started off with a welcome from Paul Kopacki, followed by some insights into the current status of developers in the world of business (apparently we're kingmakers - who knew!). One of Blackberry's evangelists came up and made a pretty good pitch for giving them a second look (the free hardware probably helped a little...)
The meat, though, was in the second half of the presentation. We were treated to a succession of great new features across Ext JS, Sencha Touch and Sencha Architect, which I'll go into in a little more detail below.
But it was Abe Elias and Jacky Nguyen who stole the show in the end. Unleashing a visionary new product, Sencha Space, they demonstrated a brand new way to enable businesses to elegantly solve the problem of BYOD (Bring Your Own Device).
Anatomy of a Sencha Touch 2 App
At its simplest, a Sencha Touch 2 application is just a small collection of text files - html, css and javascript. But applications often grow over time so to keep things organized and maintainable we have a set of simple conventions around how to structure and manage your application's code.
A little while back we introduced a technology called Sencha Command. Command got a big overhaul for 2.0 and today it can generate all of the files your application needs for you. To get Sencha Command you'll need to install the SDK Tools and then open up your terminal. To run the app generator you'll need to make sure you've got a copy of the Sencha Touch 2 SDK, cd into it in your terminal and run the app generate command:
This creates an application called MyApp with all of the files and folders you'll need to get started generated for you. You end up with a folder structure that looks like this:
Building a data-driven image carousel with Sencha Touch 2
This evening I embarked on a little stellar voyage that I'd like to share with you all. Most people with great taste love astronomy and Sencha Touch 2, so why not combine them in a fun evening's web app building?
NASA has been running a small site called APOD (Astronomy Picture Of the Day) for a long time now, as you can probably tell by the awesome web design of that page. Despite its 1998-era styling, this site incorporates some pretty stunning images of the universe and is begging for a mobile app interpretation.
We're not going to go crazy, in fact this whole thing only took about an hour to create, but hopefully it's a useful look at how to put something like this together. In this case, we're just going to write a quick app that pulls down the last 20 pictures and shows them in a carousel with an optional title.
Here's what it looks like live. You'll need a webkit browser (Chrome or Safari) to see this, alternatively load up http://code.edspencer.net/apod on a phone or tablet device:
Like Android? Help us fix it
Near the end of last week's Sencha Touch 2 beta release blog post there was an appeal to the community to help raise awareness of a nasty flashing issue with Android 4.x phones. Every time you tried to use an animation on a web page the browser would flash, wait a bit, then finally perform the animation.
We filed a ticket on this about a week ago and thanks to your help (over 300 of you starred the issue), got a prompt response from the Android team with a fix for the flashing issue.
Getting it Right
However, that's only half the story. While the ugly flash is gone, animation performance on Android 4.x phones is still unacceptable. As it stands a 2 year old device running Android 2.x easily outruns the top of the range devices today running 4.x.
We really want to have excellent support for all Android devices. While 4.x accounts for only 1% of all Android phones today, that number is only going to go up. And when it does, we want to be ready to ship fast, fluid, beautiful apps onto it.
So we've created a new ticket with reduced, reproducible test cases and filed it to the bug tracker. We'll continue to give the Android team as much support as we can in order to resolve this quickly, but once again we'll need your help.
Sencha Touch 2 Hits Beta
Earlier today we released Sencha Touch 2 Beta 1 - check out the official sencha.com blog post and release notes to find out all of the awesome stuff packed into this release.
This is a really important release for us - Sencha Touch 2 is another huge leap forward for the mobile web and hitting beta is a massive milestone for everyone involved with the project. From a personal standpoint, working on this release with the amazing Touch team has been immensely gratifying and I hope the end result more than meets your expectations of what the mobile web can do.
While you should check out the official blog post and release notes to find out the large scale changes, there are a number of things I'd really like to highlight today.
A Note on Builds
Before we get into the meat of B1 itself, first a quick note that we've updated the set of builds that we generate with the release. Previously there had been some confusion around which build you should be using in which circumstances so we've tried to simplify that.
The Class System in Sencha Touch 2 - What you need to know
Sencha Touch 1 used the class system from Ext JS 3, which provides a simple but powerful inheritance system that makes it easier to write big complex things like applications and frameworks.
With Sencha Touch 2 we've taken Ext JS 4's much more advanced class system and used it to create a leaner, cleaner and more beautiful framework. This post takes you through what has changed and how to use it to improve your apps.
Syntax
The first thing you'll notice when comparing code from 1.x and 2.x is that the class syntax is different. Back in 1.x we would define a class like this:
This would create a subclass of Ext.Panel called MyApp.CustomPanel, setting the html configuration to 'Some html'. Any time we create a new instance of our subclass (by calling new MyApp.CustomPanel()), we'll now get a slightly customized Ext.Panel instance.
Sencha Touch 2 PR4 - Big Improvements in Data and MVC
Today we released Sencha Touch 2.0 PR4 - the fourth and final preview release before we hit beta. While we're technically calling this one a preview release, we're pretty happy with the performance, stability and overall quality of this release and consider it exceptionally close to beta quality.
As well as a good number of enhancements and bug fixes PR4 brings a couple of long-awaited improvements to two of the most important parts of Sencha Touch - the data package and the application architecture.
First up, the data package has been ported to use the new config system, which normalizes all of the configuration options for every class in the data package, providing a clean and predictable way to configure and update your data classes. We're still cleaning up some of the data package documentation and given the scope of some of the changes we're expecting a few bugs to appear as a result but overall we're very happy with the improved capabilities of Ext.data.
MVC Improvements
The second big improvement in PR4 is to the application architecture. The MVC classes have also been upgraded to use the new config system, again yielding big improvements in the API and general flexibility of your code.
Sencha Touch 2 - Thoughts from the Trenches
As you may have seen, we put out the first public preview release of Sencha Touch 2 today. It only went live a few hours ago but the feedback has been inspiring so far. For the full scoop see the post on the sencha.com blog. A few thoughts on where we are with the product:
Performance
Performance on Android devices in particular is breathtaking. I never thought I'd see the day where I could pick up an Android 2.3 device and have it feel faster than an iPhone 4, and yet that's exactly what Sencha Touch 2 brings to the table. I recorded this short video on an actual device to show real world performance:

Now try the same on Sencha Touch 1.x (or any other competing framework) and (if you're anything like me) cringe at what we were accustomed to using before. That video's cool, but the one that's really driving people wild is the side by side comparison of the layout engines in 1.x and 2.x.
Getting our hands on a high speed camera and recording these devices at 120fps was a lot of fun. Slowing time down to 1/4 of normal speed shows just how much faster the new layout engine is than what we used to have:
Proxies in Ext JS 4
One of the classes that has a lot more prominence in Ext JS 4 is the data Proxy. Proxies are responsible for all of the loading and saving of data in an Ext JS 4 or Sencha Touch application. Whenever you're creating, updating, deleting or loading any type of data in your app, you're almost certainly doing it via an Ext.data.Proxy.
If you've seen January's Sencha newsletter you may have read an article called Anatomy of a Model, which introduces the most commonly-used Proxies. All a Proxy really needs is four functions - create, read, update and destroy. For an AjaxProxy, each of these will result in an Ajax request being made. For a LocalStorageProxy, the functions will create, read, update or delete records from HTML5 localStorage.
Because Proxies all implement the same interface they're completely interchangeable, so you can swap out your data source - at design time or run time - without changing any other code. Although the local Proxies like LocalStorageProxy and MemoryProxy are self-contained, the remote Proxies like AjaxProxy and ScriptTagProxy make use of Readers and Writers to encode and decode their data when communicating with the server.
Introduction to Ext JS 4
At the end of last 2010 we capped off an incredible year with SenchaCon - by far the biggest gathering of Sencha developers ever assembled. We descended on San Francisco, 500 strong, and spent an amazing few days sharing the awesome new stuff we're working on, learning from each other, and addressing the web's most pressing problems.
Now, we're proud to release all of the videos from the conference completely free for everyone. You can see a full list on our conference site, where you'll find days worth of material all about Ext JS 4, Sencha Touch and all of the other treats we're working on at the moment.
Some of the videos in particular stand out for me - Jamie's Charting and Layouts talks were spectacular, as was Rob's Theming Ext JS 4 talk. On the Touch side, Tommy's talks on Performance and Debugging are required viewing, as is Dave Kaneda's characteristically off the cuff Theming talk.
My personal high point was standing in front of all of you and introducing Ext JS 4 and its three core goals - speed, stability and ease of use. I think you're going to love what we've done with the framework in version 4.
Ext JS 4: The Class Definition Pipeline
Last time, we looked at some of the features of the new class system in Ext JS 4, and explored some of the code that makes it work. Today we're going to dig a little deeper and look at the class definition pipeline - the framework responsible for creating every class in Ext JS 4.
As I mentioned last time, every class in Ext JS 4 is an instance of Ext.Class. When an Ext.Class is constructed, it hands itself off to a pipeline populated by small, focused processors, each of which handles one part of the class definition process. We ship a number of these processors out of the box - there are processors for handling mixins, setting up configuration functions and handling class extension.
The pipeline is probably best explained with a picture. Think of your class starting its definition journey at the bottom left, working its way up the preprocessors on the left hand side and then down the postprocessors on the right, until finally it reaches the end, where it signals its readiness to a callback function:
Classes in Ext JS 4: Under the hood
Last week we unveiled a the brand new class system coming in Ext JS 4. If you haven’t seen the new system in action I hope you’ll take a look at the blog post on sencha.com and check out the live demo. Today we’re going to dig a little deeper into the class system to see how it actually works.
To briefly recap, the new class system enables us to define classes like this:
Here we’ve set up a slightly simplified version of the Ext.Window class. We’ve set Window up to be a subclass of Panel, declared that it requires the Ext.Tool class and that it mixes in functionality from the Ext.util.Draggable class.
There are a few new things here so we’ll attack them one at a time. The ‘extend’ declaration does what you’d expect - we’re just saying that Window should be a subclass of Panel. The ‘requires’ declaration means that the named classes (just Ext.Tool in this case) have to be present before the Window class can be considered ‘ready’ for use (more on class readiness in a moment).
Sencha Touch tech talk at Pivotal Labs
I recently gave an introduction to Sencha Touch talk up at Pivotal Labs in San Francisco. The guys at Pivotal were kind enough to record this short talk and share it with the world - it's under 30 minutes and serves as a nice, short introduction to Sencha Touch:
UPDATE: Pivotal got acquired, this link broke. The world moved on.
The slides are available on slideshare and include the code snippets I presented. The Dribbble example used in the talk is very similar to the Kiva example that ships with the Sencha Touch SDK, so I recommend checking that out if you want to dive in further.
Using the Ext JS PivotGrid
One of the new components we just unveiled for the Ext JS 3.3 beta is PivotGrid. PivotGrid is a powerful new component that reduces and aggregates large datasets into a more understandable form.
A classic example of PivotGrid's usefulness is in analyzing sales data. Companies often keep a database containing all the sales they have made and want to glean some insight into how well they are performing. PivotGrid gives the ability to rapidly summarize this large and unwieldy dataset - for example showing sales count broken down by city and salesperson.
A simple example
We created an example of this scenario in the 3.3 beta release. Here we have a fictional dataset containing 300 rows of sales data (see the raw data). We asked PivotGrid to break the data down by Salesperson and Product, showing us how they performed over time. Each cell contains the sum of sales made by the given salesperson/product combination in the given city and year.
Let's see how we create this PivotGrid:
Offline Apps with HTML5: A case study in Solitaire
One of my contributions to the newly-launched Sencha Touch mobile framework is the Touch Solitaire game. This is not the first time I have ventured into the dizzying excitement of Solitaire game development; you may remember the wonderful Ext JS Solitaire from 18 months ago. I'm sure you'll agree that the new version is a small improvement.

Solitaire is a nice example of a fun application that can be written with Sencha Touch. It makes use of the provided Draggables and Droppables, CSS-based animations, the layout manager and the brand new data package. The great thing about a game like this though is that it can be run entirely offline. Obviously this is simple with a native application, but what about a web app? Our goal is not just having the game able to run offline, but to save your game state locally too.
The answer comes in two parts:
Web Storage and the Sencha data package
HTML5 provides a brand new API called Web Storage for storing data locally. You can read all about it on my Web Storage post on Sencha's blog but the summary is that you can store string data locally in the browser and retrieve it later, even if the browser or the user's computer had been restarted in the meantime.
Ext JS 3.2 beta out today
We pushed out a beta release of Ext JS 3.2 this morning. Although we've marked it as beta, it's a pretty solid release and we expect to release a final version shortly. The DataView transitions are especially fun - watch this space for a fuller example...
Here's a quick rundown of the features we added:
- Multiple sorting and filtering on Stores
- Animated DataView transitions
- Composite Fields
- Multiple handles on Sliders
- Sliders in forms
- A couple of Toolbar plugins
- A new, more accessible theme
One of the big projects we've undertaken that most people probably won't find so exciting is ramping up our internal QA efforts. Our unit test coverage has increased dramatically in the past couple of months, and we've built infrastructure to run all of our tests on every browser/OS we support in a fully automated fashion. Doing TDD on Ext JS is an awesome feeling.
I'll talk more in the future about what we're doing internally to ensure the quality of our code, framework performance and rendering.
2010: The year Ext JS takes over
On January 1st 2010 I officially joined Ext JS to take over the role of lead developer. After living and breathing Ext for the last 3 years I am delighted to have joined the company itself. Ext JS has lead the way in developing rich client side applications since the very first release; this is a tradition we will continue and build upon.
2010 is going to be an extremely exciting year for Ext JS. A new focus is being placed on helping developers create their applications much more quickly, with the help of advanced creation tools and a standardised application architecture right out of the box.
We will continue the performance improvements started in 3.1 to make sure that Ext applications really fly. Ext JS 3.2 will be the fastest, most stable version ever released.
2010 is also the year that Ext JS becomes much easier to learn. With a completely reinvented learning section, Ext will no longer take months to learn and understand - even our API documentation will get a facelift.
The upcoming Marketplace will be the perfect venue to find and share new, high quality components created by our awesome developer community. Think of the Marketplace as the App Store for Ext JS - full of great offerings that are easy to drop in to any application.
Ext.ux.Exporter - export any Grid to Excel or CSV
Sometimes we want to print things, like grids or trees. The Ext JS printing plugin is pretty good for that. But what if we want to export them instead? Enter Ext.ux.Exporter.
Ext.ux.Exporter allows any store-based component (such as grids) to be exported, locally, to Excel or any other format. It does not require any server side programming - the export document is generated on the fly, entirely in JavaScript.
The extension serves as a base for exporting any kind of data, but comes bundled with a .xls export formatter suitable for exporting any Grid straight to Excel. Here's how to do that:
Clicking the Download button in the top toolbar iterates over the data in the store and creates an Excel file locally, before Base64 encoding it and redirecting the browser via a data url. If you have Excel or a similar program installed your browser should ask you to save the file or open it with Excel.
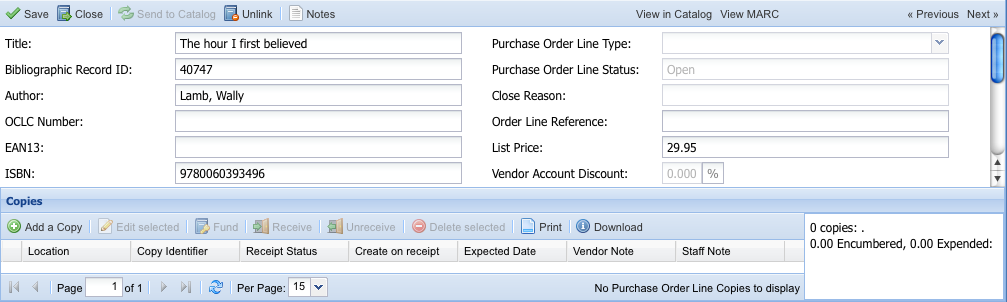
Making RowEditor use your column renderers
The RowEditor plugin is one of my favourite Ext JS components. It basically allows any row on a grid to be turned into an adhoc form on the fly, saving you the effort of defining additional form components.
Recently I had a grid which had a few fields that don't have an editor, something like this:
Simple stuff - we just show a username and a signup date, which is altered by a renderer. When we double-click a row it turns into an editable row, and we get a textfield allowing us to edit the username. Unfortunately, while in edit mode our date renderer is ignored, and the raw value displayed instead.
Writing Better JavaScript - split up long methods
For the second time this week I'm going to pick on the usually delightful Ext JS library. Last time we discussed the overzealous use of the Module pattern; this time it's the turn of bloated methods.
As before, I'm not really picking on Ext at all - this happens all over the place. But again, this is the library closest to my heart and the one I know the best.
The Problem
We're going to take a look at Ext.data.XmlReader's readRecords method. Before we get started though, I'll repeat that this is intended as an example of an approach, not a whine at Ext in particular.
ExtJS modules and mixins
A few days back Praveen Ray posted about "Traits" in Ext JS. What he described is pretty much what we'd call Modules in the Ruby world, and how to mix those modules into a given class.
Basically, using modules we can abstract common code into reusable chunks, and then include them into one or more classes later. This has several advantages - avoiding code repetition, decoupling code concepts and ease of unit testing among them.
While the idea is good, there is a better way of achieving this than Praveen suggests. Let's say we define the following modules, which are just plain old objects:
Ext.ux.layout.FillContainer
One of the pages on the Ext JS app I'm currently working on has a form with a grid underneath. The page exists as a tab inside an Ext.TabPanel, and uses the border layout, with the form as the 'north' component and the grid as 'center'.
The trouble with this is that the grid shrinks down to an unusable size when the browser window is too small, ending up like this:
We could alternatively use a basic container layout, but this limits us to a fixed height for the grid, meaning we waste space at the bottom:

Enter the imaginatively named FillContainer:
If our containing panel shrinks to less than 650px in height, the grid will be automatically sized to 250px and a vertical scrollbar will appear on the panel, like this:
Using the ExtJS Row Editor
The RowEditor plugin was recently added to the ExtJS examples page. It works a lot like a normal Grid Editor, except you can edit several fields on a given row at once before saving.
This neatly solves the problem of adding a new row to an editor grid, entering data into the first field and finding it save itself straight away, which is rarely desired. In this fashion we can provide full CRUD for simple models in a single page.
Installation
You'll need to get a copy of the javascript, css and images from the server. This is a bit of a pain. If you still have the ExtJS SDK around you can find these in the examples folder, if not you can get each file as follows:
Grab the plugin JS file below and put it where you usually put your .js files: http://www.extjs.com/deploy/dev/examples/ux/RowEditor.js
This needs to go with your other stylesheets, usually in a directory called 'css': http://www.extjs.com/deploy/dev/examples/ux/css/RowEditor.css
Download these two images and put them into your existing 'images' folder (the same place the other ExtJS images live): http://www.extjs.com/deploy/dev/examples/ux/images/row-editor-bg.gif http://www.extjs.com/deploy/dev/examples/ux/images/row-editor-btns.gif
Ext.decorate
Sometimes you want to override one of the methods in ExtJS that return a configuration object - let's use Ext.direct.RemotingProvider's getCallData as an example, which looks like this:
Our aim is to add an 'authentication_token' property to the returned object. You could provide the full config object again in an override, but usually you're overriding to add, remove or change one or two properties and want to leave the rest unmolested. I used to find myself writing a lot of code with this pattern:
Ext.ux.Printer - printing for any ExtJS Component
After my recent foray into printing grids with ExtJS, I realised I needed to print some trees too. Seeing as some of the work was already done for the Grid example, it made sense to create a common API for printing any Ext.Component. And thus Ext.ux.Printer was born:
Each of the above opens a new window, renders some HTML (just a big table really), prints it and closes the window - all client side with no server side code required. Although trees and grids represent data quite differently internally, we can use the same API on Ext.ux.Printer to print them both.
Ext.ux.Printer uses Renderer classes to cope with a specific xtype, and adding Renderers for other components is easy. At the moment Ext.grid.GridPanel and Ext.tree.ColumnTree are supported out of the box, but let's see how we'd add support for printing the contents of an Ext.Panel:
ExtJS grid page size - letting the user decide
Sometimes you'll be using a Paging Toolbar on a grid and need to give the user the ability to change the number of records per page. One way of doing this is by adding a combobox to the toolbar:
We've set up a simple combo box which allows the user to choose between 15, 25 and 50 records per page. Now let's set up a Paging Toolbar, and a listener to take action when the user changes the selection in the combo box:
Printing grids with Ext JS
Grids are one of the most widely used components in Ext JS, and often represent data that the user would like to print. As the grid is usually part of a wider application, simply printing the page isn't often a good solution.
You could attach a stylesheet with media="print", which hides all of the other items on the page, though this is rather application-specific, and a pain to update. It would be far better to have a reusable way of printing the data from any grid.
The way I went about this was to open up a new window, build a table containing the grid data into the new window, then print it and close. It's actually pretty simple, and with a bit of CSS we can even get the printable view looking like it does in the grid.
Here's how you use it (this is a slightly modified version of the Array Grid Example):
Ext.override - Monkey Patching Ext JS
Ext JS contains a function called Ext.override. Using this function allows you to add functionality to existing classes, as well as override properties of the class. For example, let's say we want to override how Ext.Windows are hidden:
Using Ext.override changes the prototype of the class you are overriding - all instances of Ext.Window will now use the new hide function in the example above.
Overriding other classes can be dangerous, especially when they are classes from a library not under your control. For example, if the Ext.Window class was refactored in a later version, your overrides may no longer work. In some situations you might choose to go down the safer route of augmenting the existing functionality without overriding it. Here's one way we can achieve this using a closure:
Ext JS iterator functions
Ext JS has a number of handy iterator functions. Some, like Ext.each, you probably already know about, but there are a few others lurking around which can be useful in saving yourself a few lines of code. First, let's recap Ext.each:
Ext.each
Ext.each applies a function to each member of an array. It's basically a more convenient form of a for loop:
Ext.iterate
The case for Ext.applyOnly
Update: Ext 3.0RC1 has included something like this, but called Ext.copyTo. Obviously my name is better though.
We should have something like this:
You could use this every time you write a method or class that requires a config Object as one of it's parameters. These methods ought to only apply those properties of the config object they actually need, but usually this will just be done with an Ext.apply(this, config). This means anything in your object could be overwritten by this config object. Sometimes that's a good thing, but sometimes it's definitely not.
Ext.applyOnly() applies only a whitelist of the properties in the config object. These are specified by an optional third argument, which is an array of property names. Here's how you might write applyOnly:
Force Ext.data.Store to use GET
Say you have a simple Ext store:
Which you put in a grid, along with a paging toolbar:
Your grid loads up and the store performs a GET request to /widgets.json, which returns your widgets along with a total (see an example).
Awesome, but now we click one of the paging buttons on the PagingToolbar and we have a problem - our request has turned into POST /widgets.json, with "start=20" and "limit=20" as POST params.
Adding a loading mask to your ExtJS application
Adding a loading mask like the one on the ExtJS API application is a nice way of showing the user that something is happening while their browser downloads the source code. It's also extremely easy to do.
First, place the following HTML above all of your javascript include tags, ideally just after the <body> tag:
If you are currently including javascript files inside the <head>, don't - put them at the bottom.
With a bit of CSS (see below), this provides a white mask over all underlying content, and a loading message. When everything has loaded, remove the mask like this:
Why you should be using History in your ExtJS applications
I've been making a few updates to the ExtJS API documents application recently. The actual updates include remembering which tabs you have open and using Ext.History to go between tabs (you can follow the forum post or see a beta version).
That's not quite ready yet, but what has been made very clear to me is that any ExtJS application with more than one view should be using Ext.History. With History we get urls inside the application itself, we can parse them and dispatch accordingly. For example, I'm using a Rails-like Router, which lets you define an internal url map like this:
The router knows how to decode urls based on the regular expression-like syntax above, and parse the matches into an object - for example: