Blog
Most of my articles are about AI, UI/UX, and Open Source. I also write about leadership and management sometimes, and there's a bunch of old Sencha stuff lying around from decades ago too.

AI
Adventures in training models, building on top of OpenAI, using machine learning to solve problems.

UI/UX
I cut my teeth building UIs with JavaScript. It's still one of my favorite things to do. I love great UX and creating magical experiences.

Open Source
Sometimes I release stuff as Open Source, like InformAI and ReadNext which bring AI to React and Node JS
In my latest posts, I've been diving deep into the world of AI-driven development, particularly through the lens of projects like mdx-prompt and bragdoc.ai. This exploration uses NextJS and React, demonstrating how composable LLM prompts with JSX can create dynamic, user-friendly interfaces. If you're curious about the process, check out my Eval-Driven Design article, where I explore the integration of these technologies in practical applications.
I'm also excited to share developments from previous projects such as NarratorAI, and ReadNext, which offer innovative AI solutions for content recommendations and assistive tech. For those interested in blending Markdown with React components, my post on Markdown in NextJS provides useful insights. I strive to keep these tools open source, welcoming community engagement to enhance their capabilities and practicality.
herdctl: Composable Fleets of Claude Agents
I justed added support for Composable Fleets to herdctl. As I build herdctl into more projects, I increasingly find myself creating a fleet of agents per project, and wanted a way to run them all and see what's going on with them.
Fleet Composability means you can create hierarchical fleets of related agents, like this:

Fleet Composability means you can create a hierarchy of teams of agents, each with its own defined responsibilities and scratch directory that it can use to store state and artifacts. herdctl already has 4 of those agents so far, so I keep them a single fleet, but as herdctl itself is only one of the projects that I'm working on, I actually run a superfleet of all of them.
The web UI knows about fleet composability and renders my fleets like this:
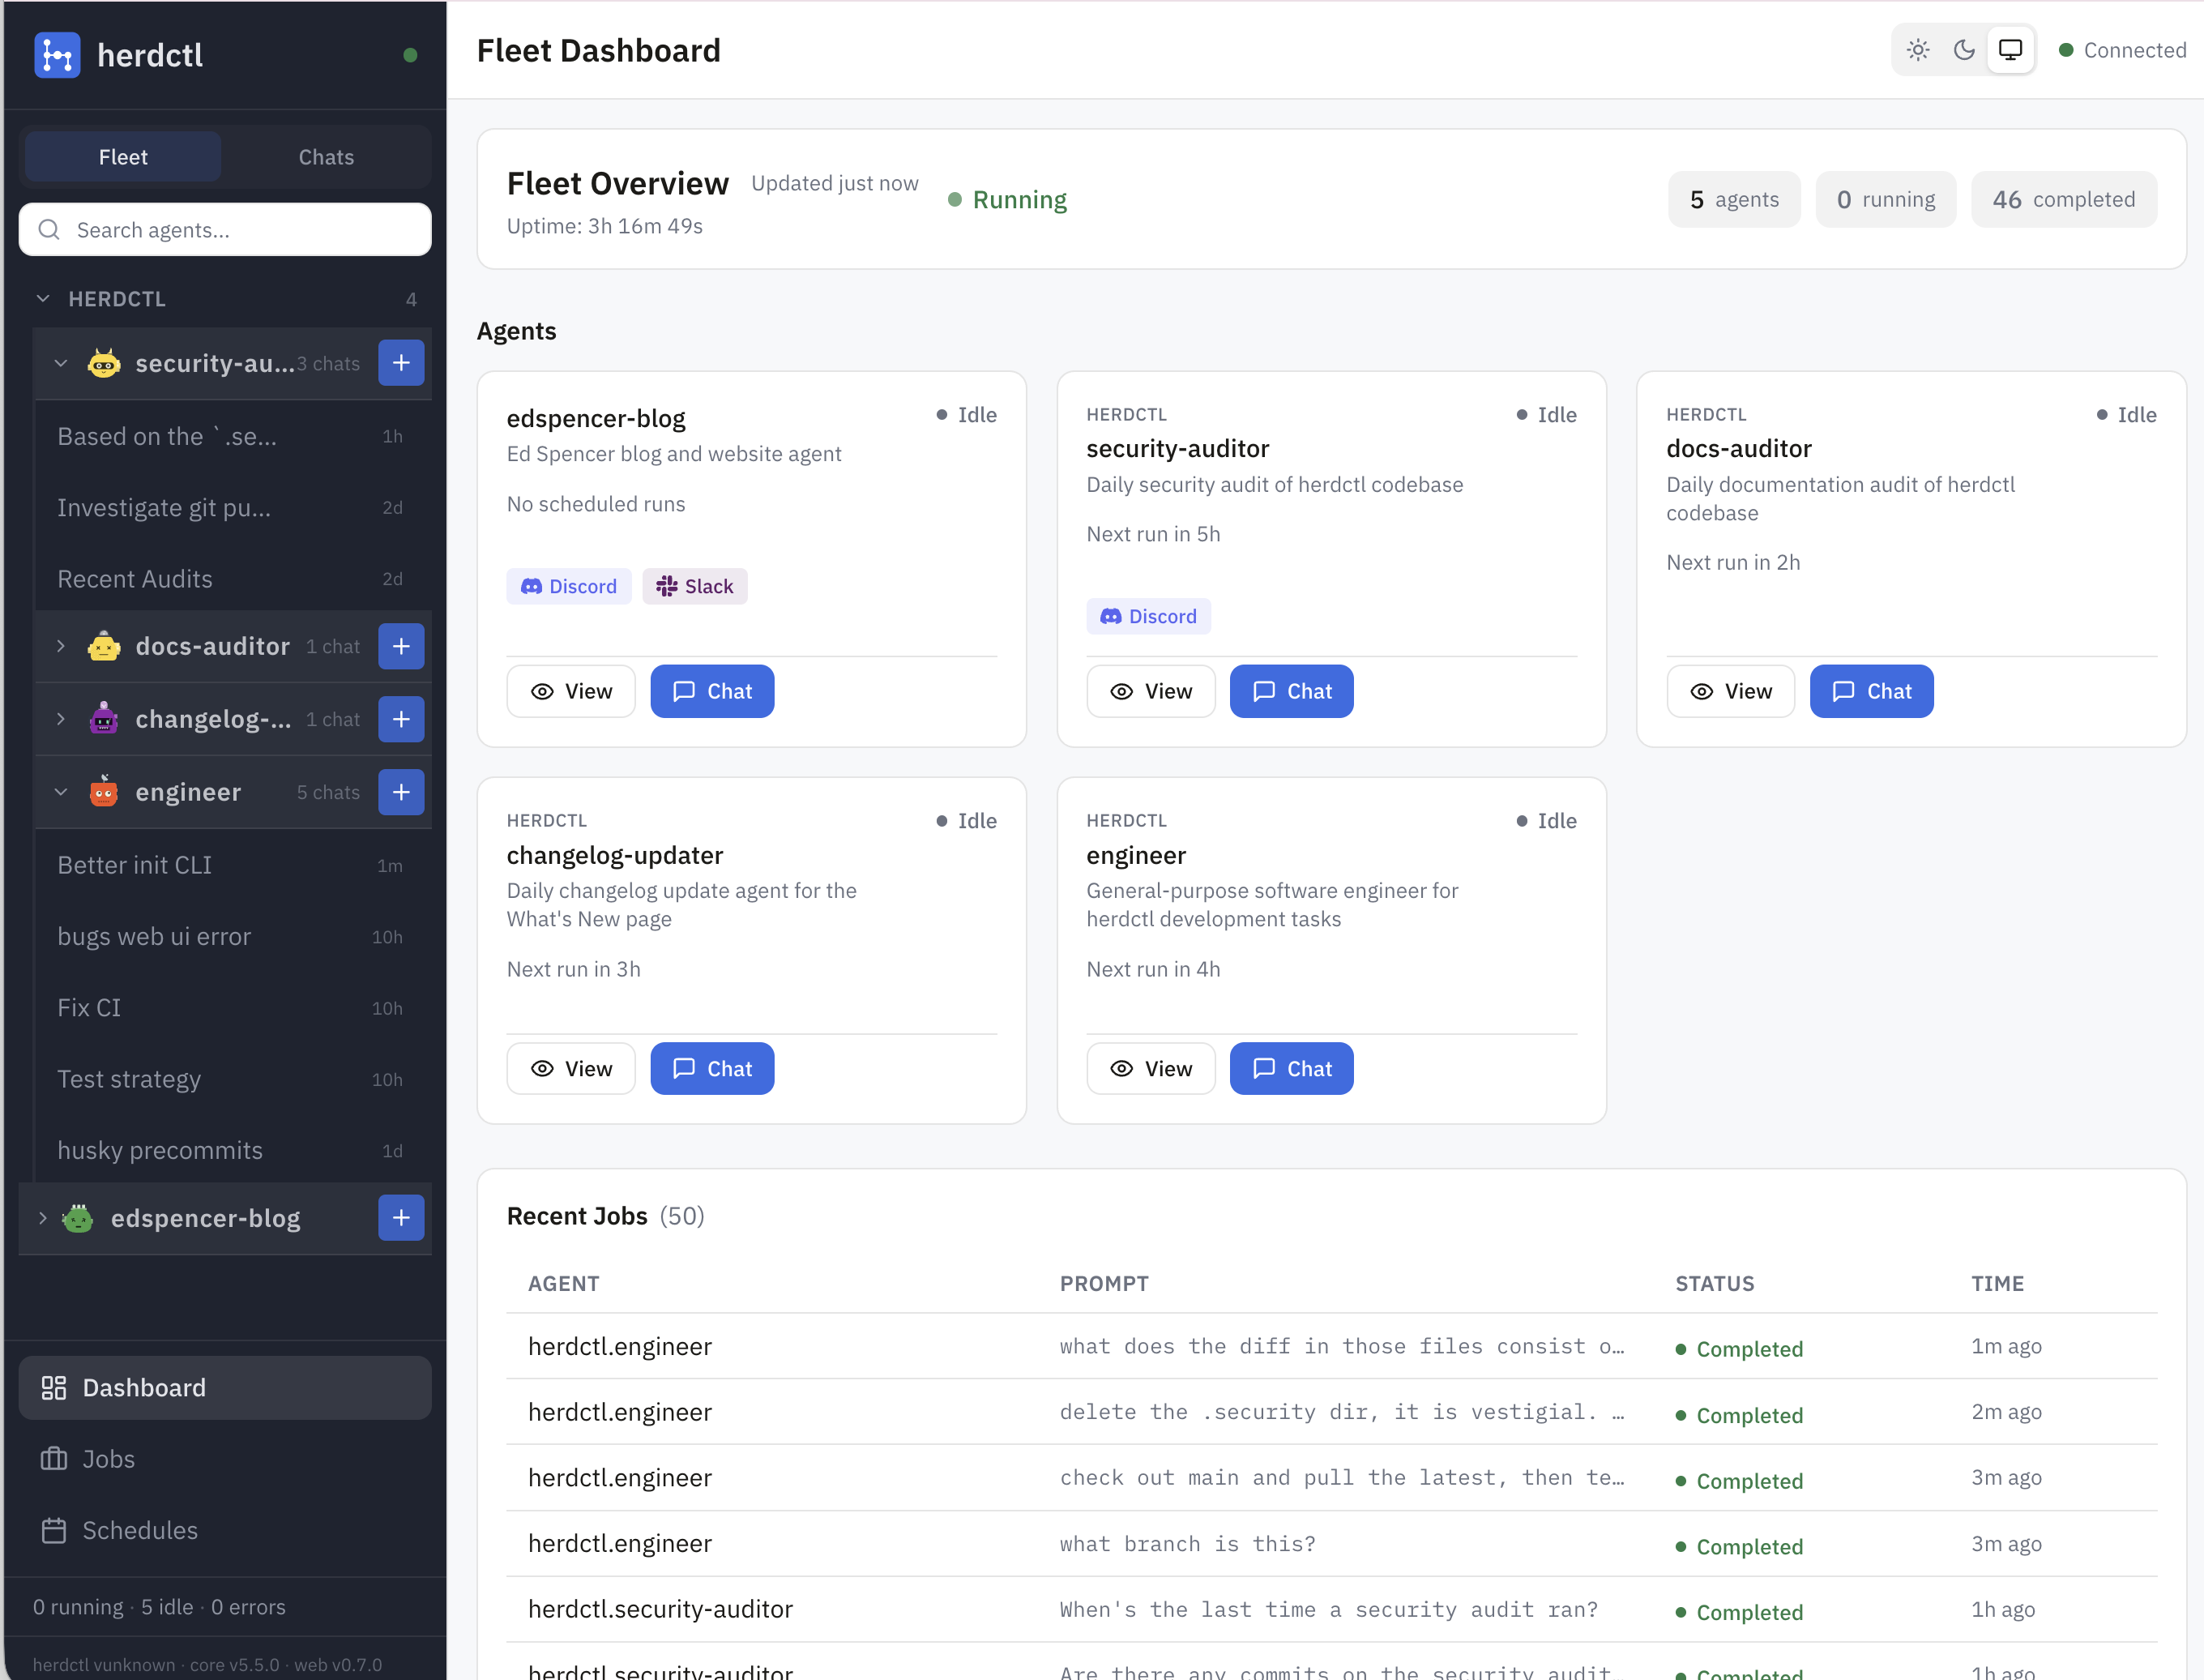
For the herdctl project itself, I'm currently running 4 agents, in a single fleet for now:
- security - daily schedule scans the repo every day for new security issues
- docs - daily schedule, scans to see if any commits should have had docs updates but didn't, makes PRs if so
- changelog - scans each day to see if we did anything worthy of putting on the docs changelog page
- engineer - general purpose engineering agent that I can chat with
The first 3 of those are all "background" agents that run on a schedule and just continually fix things that can otherwise drift over time unless a human pays attention to them. I suspect I'll end up with a bunch more agents following the same pattern. Each agent gets its own agents/myAgent directory with its own configuration and prompts. It's Claude Code so it can do whatever you want it to really.
Continuous Security Auditing with herdctl
One of the most valuable unlocks with herdctl for me has been having a bunch of agentic things that just happen every day, without me having to intervene. herdctl itself already uses the following agents that run on a daily schedule:
- changelog - updates the docs changelog page if anything worthy happened that didn't make it there already
- docs - scans to see if any commits should have had docs updates but didn't, makes PRs if so
- security - daily schedule scans the repo every day for new security issues
There are others that I want to set up, like a twitter bot that advertises new features just dropped, docs updates, etc, but today I'll focus more on the third agent above - the security agent.
Daily Security Scans
The Daily Security Scan agent was the first one I set up - a couple of weeks ago now. I gave it a remit that looks a bit like this:
- Develop and maintain a model of the codebase
- Track which areas of the code are most vulnerable
- Track ongoing potential security vulnerabilities
- Run a daily scan to re-check everything
- Alert me if anything looks suspicious
Ok, but why do this daily at all? If we can do all this in an automated way, why not do it on every commit? Two main reasons:
- cost - the last run went for 37 minutes, which is a lot of tokens
- lead time - the last run went for 37 minutes... CI currently takes about 1 minute
Of course, you can run the security scan agent as often as you like, and every time you merge code, it should be after a security-minded review has been done. But there is value in running them periodically, in addition to at merge-time. First, it's possible for multiple PRs to combine to create a security problem that no single one of them did by itself and might not otherwise be detected.
Herdctl Gains Slack and Web Connectors
This week herdctl gained support for Slack and Web connectors, opening up two new ways to interact with your Claude Code agents, running on whatever machine you like.
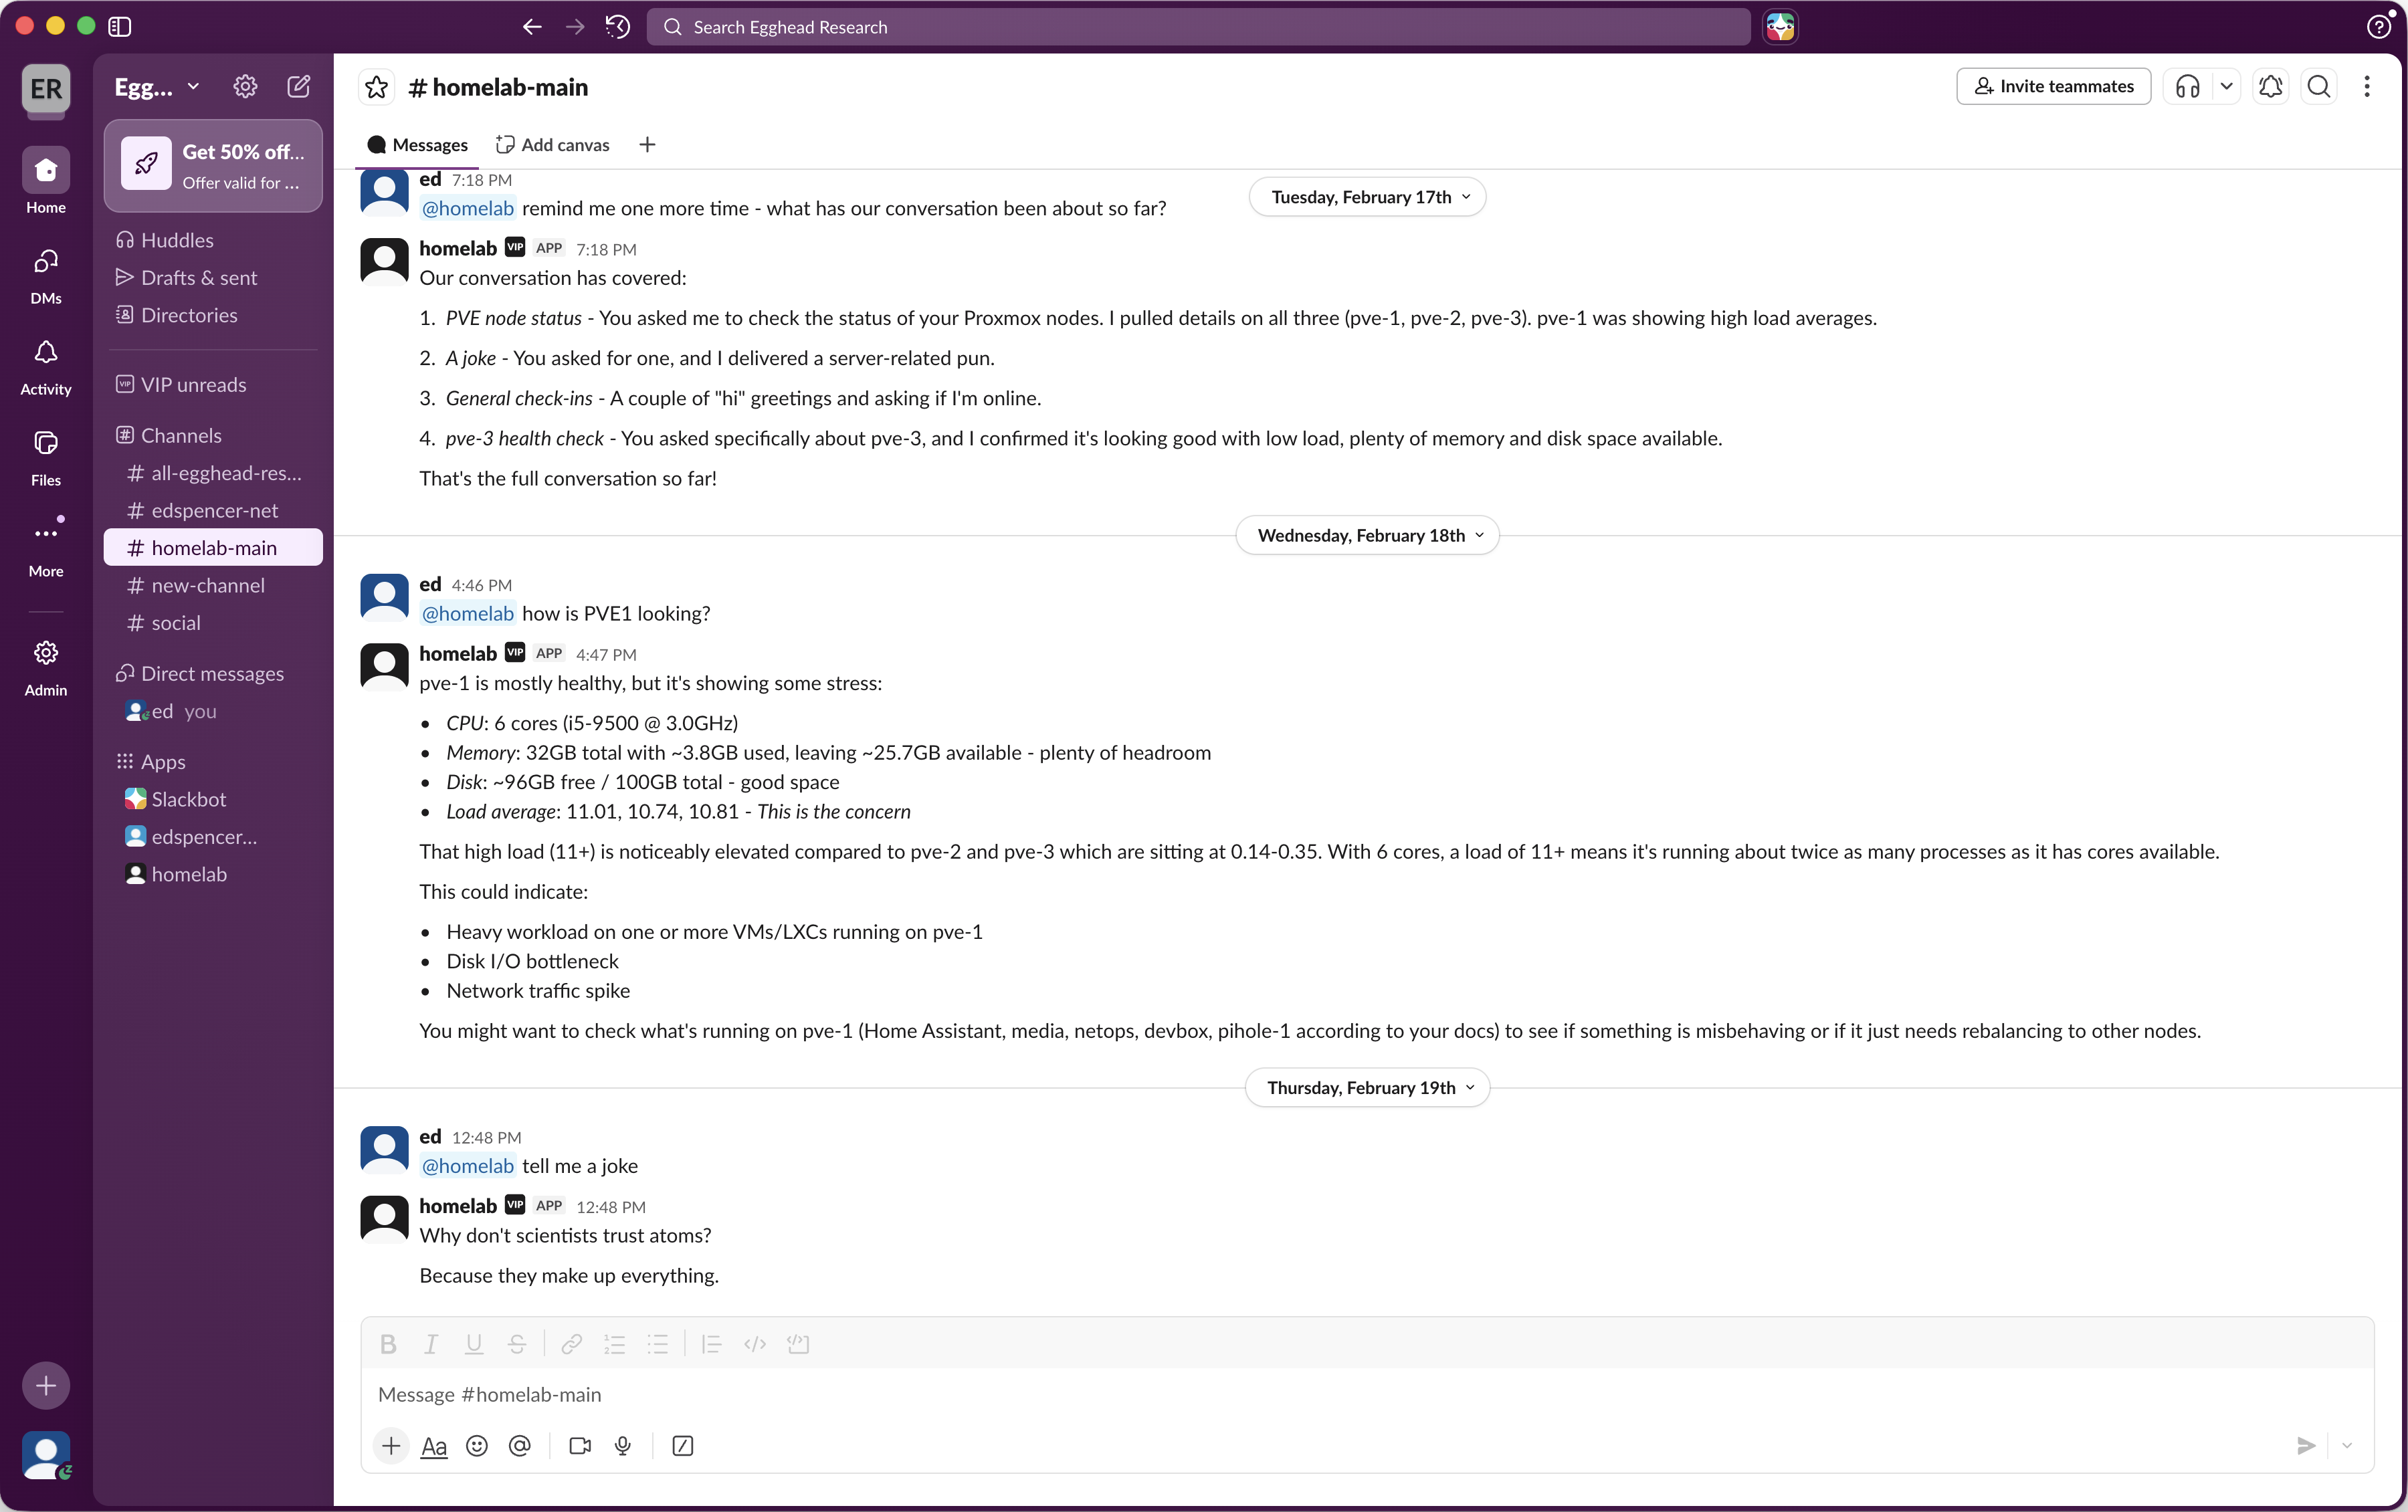
The new web UI provides fleet management and a chat frontend. It's a bring-your-own-auth app that you can configure to run on your laptop, on a proxmox machine (I do both), in the cloud, or wherever. Enable it like this in your fleet config:
Then just start your fleet like normal:
Here's what it looks like:
Make Switches Quiet Again
I recently upgraded to 2.5 gigabit managed switches for my home network. That's mostly been a straightforward process - I was swapping a TP-Link TL-SG2016P for a TP-Link SG3218XP-M2: both switches have 16 ports (8 ports POE+), but the SG3218XP-M2 swaps out the 1 gigabit ports for 2.5 gigabit ports, and adds 2x 10 gigabit SFP ports for fiber connections.
As I have a disturbingly large home network, I bought 3 of these switches so that I could plug everything into a 2.5g port and use the 10g ports for interconnects between the switches themselves. Each switch is in a different cupboard/closet in the house, with one of them being in the home theater closet and another in the bedroom closet. If they're noisy, they're annoying.

And noisy they are. It's my first time owning switches that make noise that can be heard from more than a few feet away. The noise all comes from a couple of tiny 40mm fans. When the switch powers up, they run at full throttle, which I measured at about 50db. After a minute or so it calms down to about 40db, but that's still actually quite annoying, and far louder than anything else in the rack
Swapping the fan is easy
Thankfully it's pretty easy to solve this. Noctua make these lovely silent 40mm fans that are perfect for the job. They're a straight swap and the process is straightforward. I used these tools:

You don't need to use these exact tools but here are links to the ones I have. The hobby knife set is a bit of a steal at < $10, and the set came with the little tweezers pictured above, which were useful when putting the washers back on the machine screws:
- Basic pliers ($9)
- Cheap hobby knife ($9)
- Megapro precision screwdriver ($38)
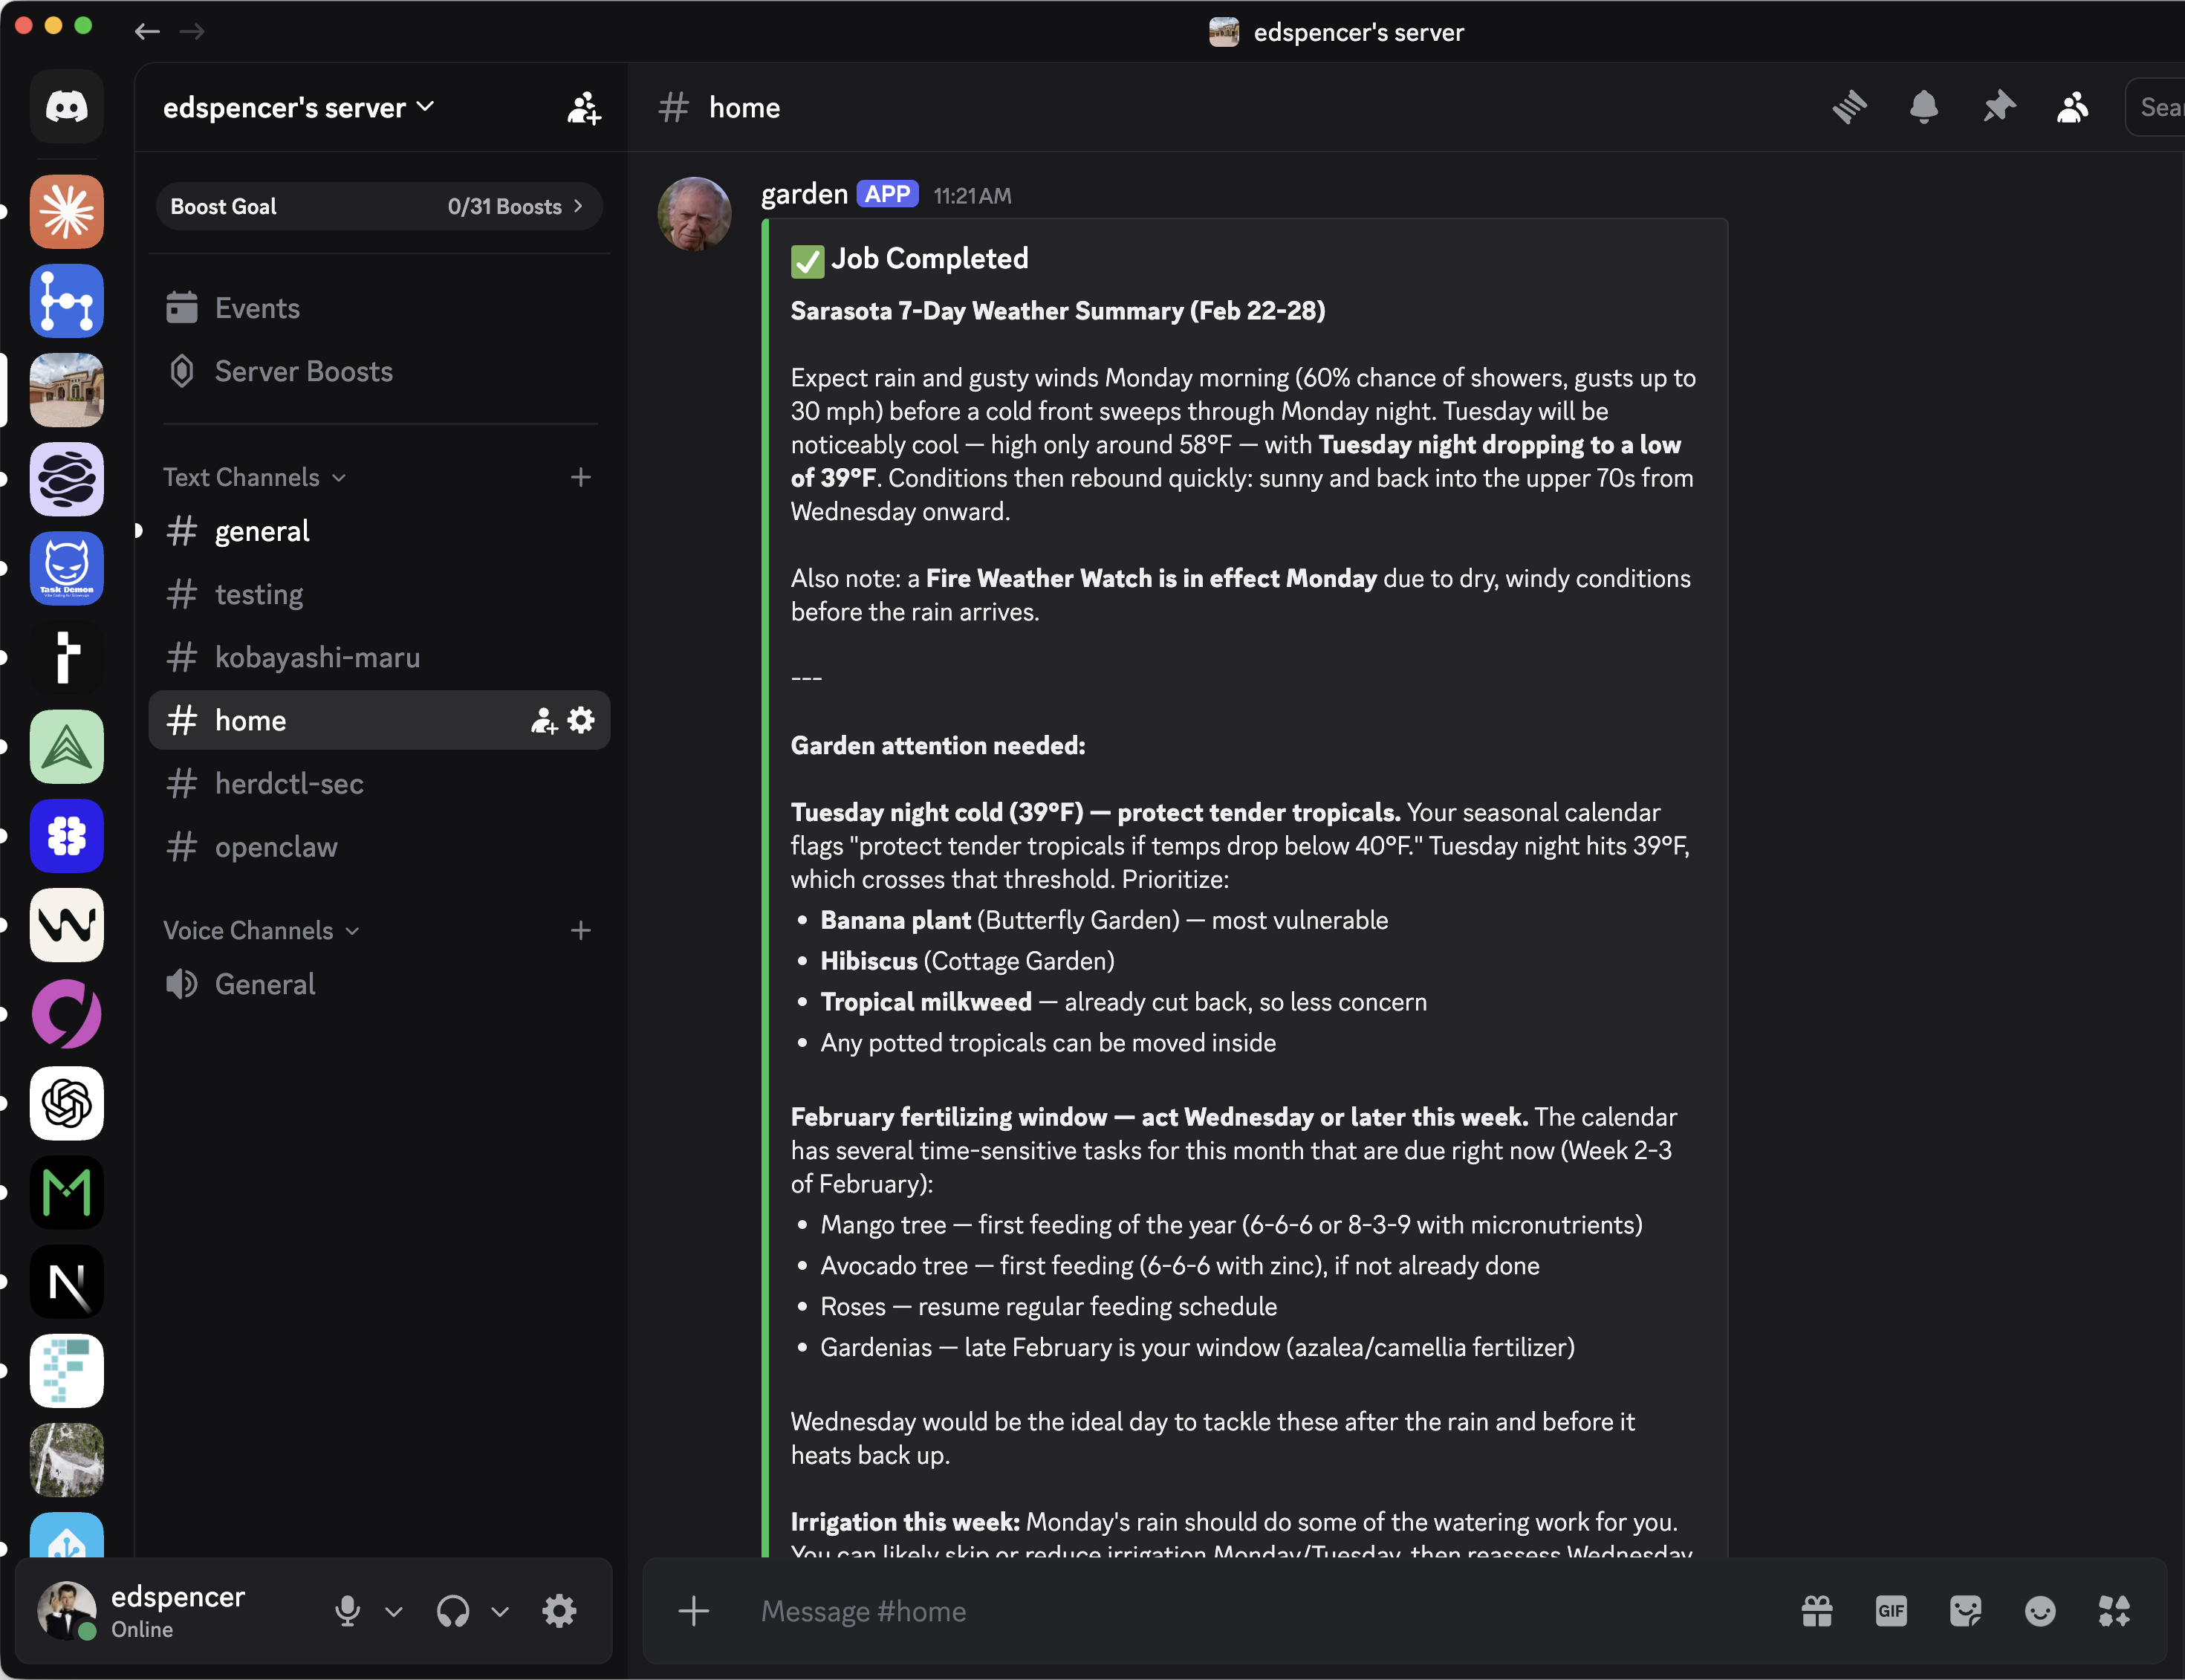
Run Claude Code Agents in Docker with herdctl
herdctl can now run Claude Code Agents in Docker containers, significantly expanding your options for running powerful local agents that do not have full access to your system - whether you're running agents on your laptop, in the cloud or both.
Enabling docker mode is really easy:
A full agent definition now looks something like this:
The above is a snippet of an actual "Subject Matter Expert" agent that I run - in this case it helps me with gardening. This agent is actually open-source - it's highly specific to my specific situation, but it should illustrate how this simple pattern works. We'll come back to that repo in a moment.
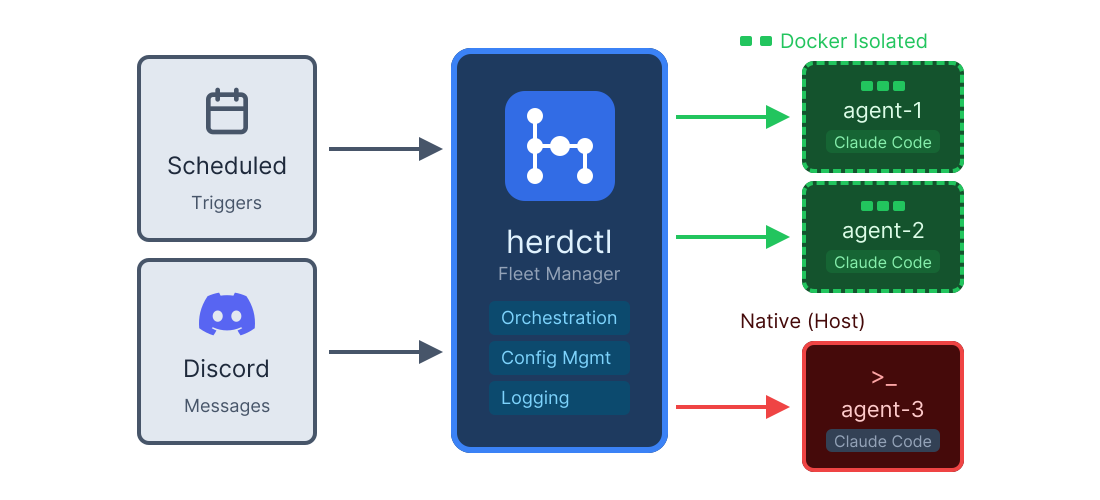
herdctl: an orchestration layer for Claude Code
I love Claude Code, but there are three things I really wish it could do:
- Invoke itself, on a schedule or in response to events
- Let me talk to it over discord or slack
- Let me coordinate dozens of Claude Code agents together
This is what herdctl aims to do. herdctl is an MIT-licensed orchestration layer for Claude Code. More accurately, it's an orchestration layer for the Claude Agents SDK, upon which herdctl is built. It's been built in about a week using a combination of Claude Code, ralph wiggum, and GSD. It is not production ready.
Here's a video showing it in action:
You can join the discord server to chat with those Star Trek agents. They're running in a container on an old machine in my homelab so although there's not a whole lot to be gained by trying to talk them into doing bad things, I am expecting people will try. Either I'll have a Lieutenant Worf up in time to guardrail those, or I'll just kill the agents, so YMMV.
Install it with npm install -g herdctl or check out the github repo and docs site for more.
What?
herdctl uses .yml files to define fleets of agents that can be invoked either on by schedule or by trigger. This is a thin wrapper around the Claude Agents SDK configurations, plus a couple of herdctl-specific ones like schedules and hooks.
frameit.dev - fast and free video thumbs, title cards and OG images
As a developer who occasionally creates technical content, I've always found thumbnail creation to be a friction point. I don't have a design background, and I don't want to pay for Photoshop or Canva Pro just to make a few YouTube thumbnails. I'd often spend more time fiddling with graphics software than actually creating the content.
What I wanted was a simple tool that would give me repeatable, correctly-sized and attractive images to use for video thumbnails, title cards, Open Graph images, and the like. I'm a big fan of the excalidraw approach: a simple, client-side app that runs in the browser, does one thing well, and does not require any information from its users.
Enter frameit.dev:

Initially vibe-coded as a way to quickly get a few consistent video titles created, it ended up being useful enough that I've been slowly iterating on it to make it better. The code is all open source, with a hosted version running at frameit.dev.
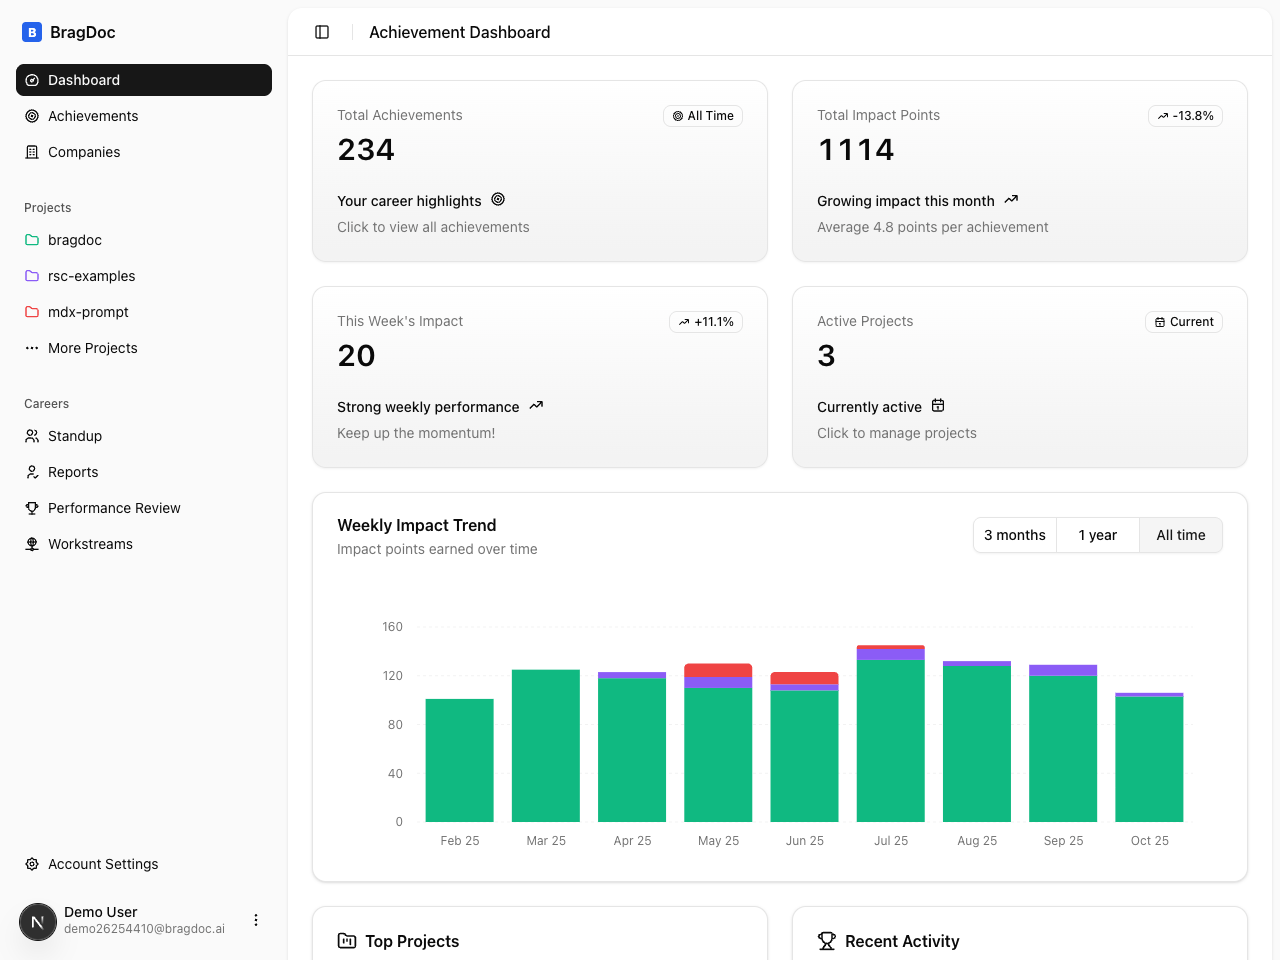
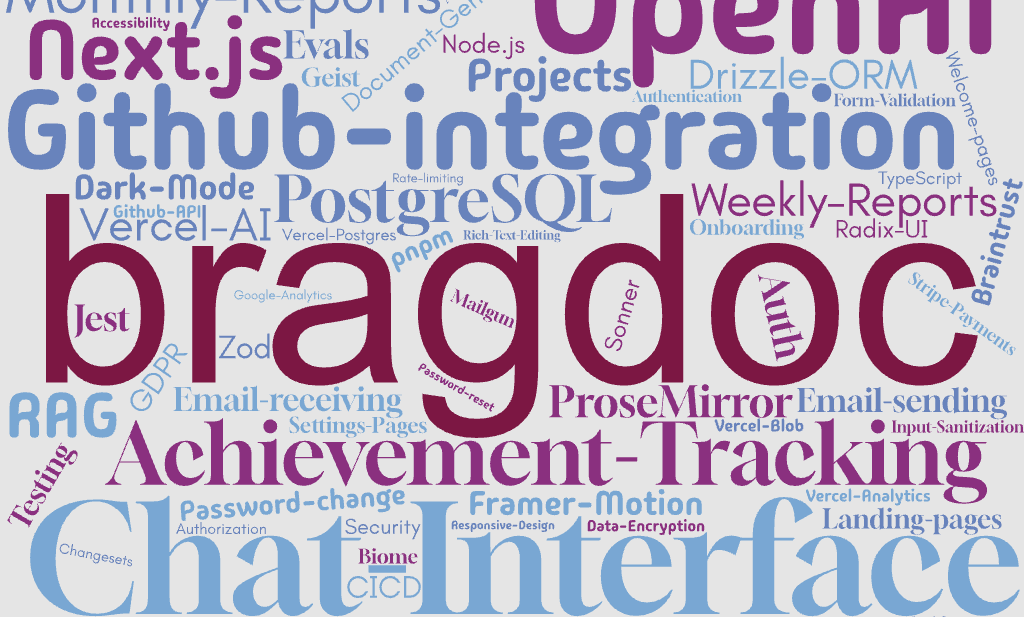
Revisiting Bragdoc
About 9 months ago I launched bragdoc.ai, an AI tool that helps software engineers keep track of their work and turn it into useful documents for performance reviews, weekly updates, and resume sections. I wrote about how I built it in 3 weeks using AI tooling, shipped it, and then... let it sit there while I worked on other things.
But I came back to it recently and gave it a complete overhaul. The core idea remains the same - automatically track your meaningful contributions from git repos and turn them into documents - but pretty much everything else got rebuilt from the ground up.
What changed
The original version worked, but it had some issues. The UI was built around a chatbot interface because, well, that's what the Vercel Chat template gave me and I was moving fast. It worked fine but it always felt a bit clunky for what is fundamentally a data management and document generation problem.
Another issue was privacy. Bragdoc doesn't require you to link to github in any way - most employers wouldn't want some random third party app to have access to their code. Previously, the CLI would extract data from your git repos and send it up to bragdoc.ai's servers, where OpenAI would process it. That's fine for a lot of use cases, but if you're working on proprietary code at a company with strict data policies, it's not so great.
So I rebuilt it with three main goals:
Privacy first: The CLI now sends git data directly to the LLM of your choice, completely bypassing bragdoc.ai's servers. Your code stays on your machine. Always.
Configurable extraction: You get four levels of data extraction to choose from - commit messages only, diff stats, truncated diffs, or full diffs. Pick what makes sense for your privacy requirements and LLM budget.
Building an LLM Router with mdx-prompt and NextJS
A few weeks ago I released mdx-prompt, which makes it easy for React developers to create composable, reusable LLM prompts with JSX. Because most AI-heavy apps will use multiple different LLM prompts, and because those prompts often have a lot in common, it's useful to be able to componentize those common elements and reuse them across multiple prompts.
I've applied mdx-prompt pretty much across the board on Task Demon and Bragdoc, which has a dozen or so different LLM prompts at the moment. In a followup post I showed how I use mdx-prompt to build the prompt that extracts achievements from git commit messages for bragdoc.ai - allowing us to build a streaming, live-updating UI powered by a composable, reusable AI prompt.
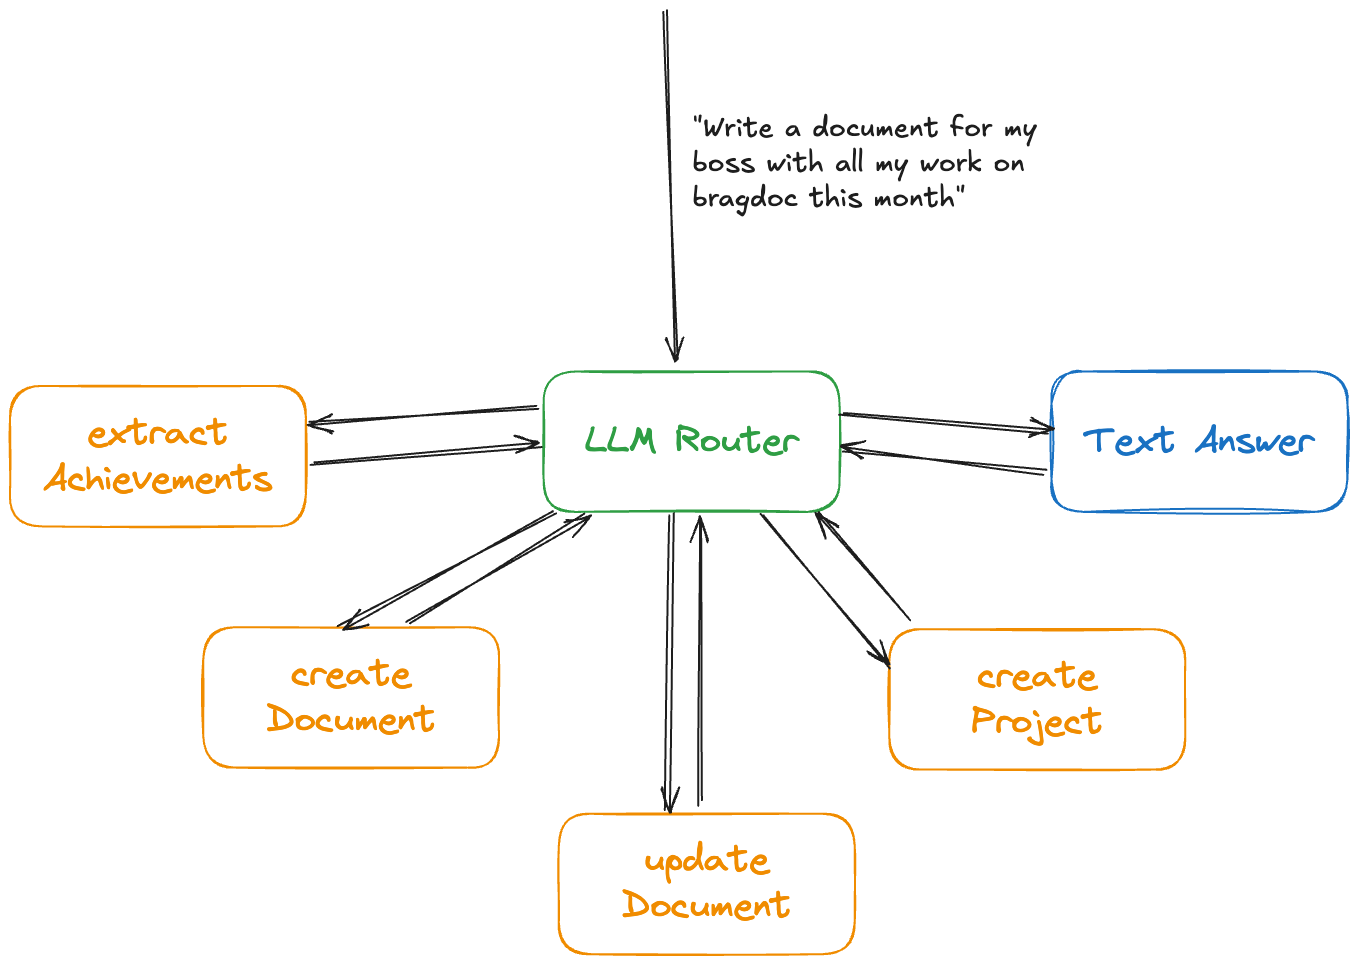
This time we're going to look at the LLM Router that serves as the entrypoint for bragdoc.ai's chatbot. LLM Routers are a common pattern in AI apps, and they can make your users' interactions with your AI app enormously more empowering if you build them properly.
LLM Routers
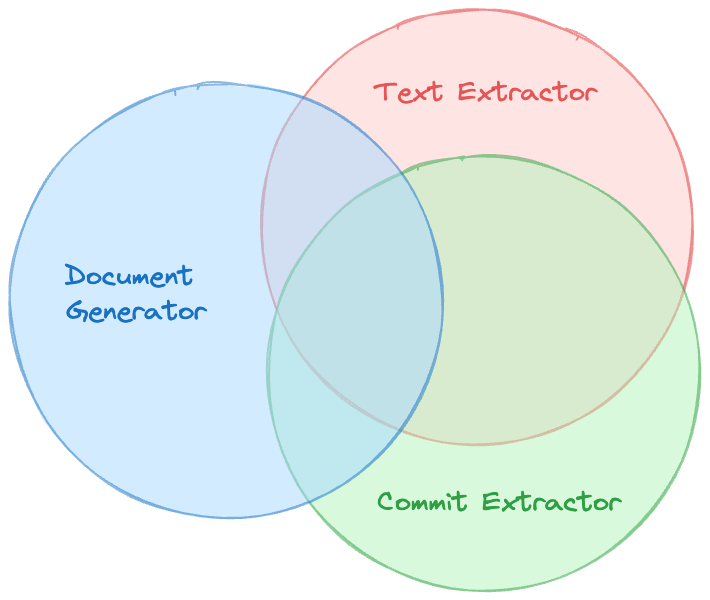
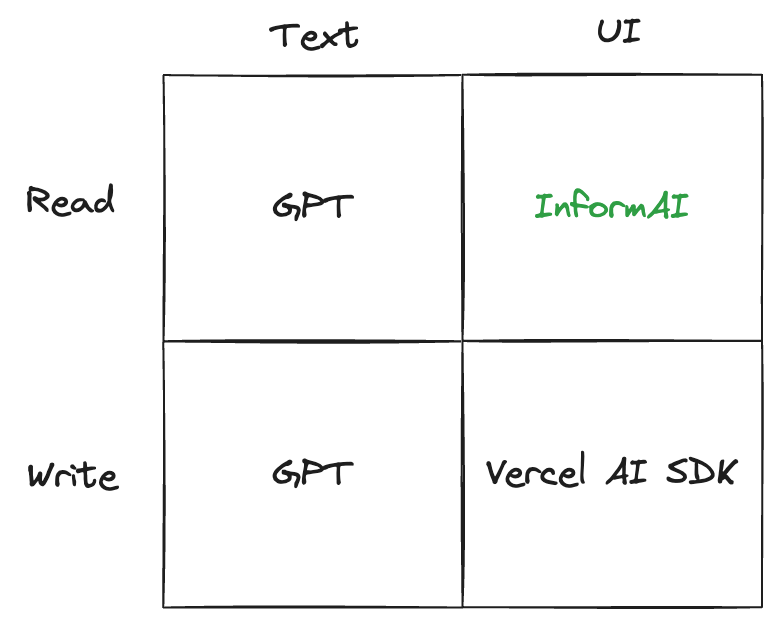
bragdoc.ai basically does 2 things: extract work achievements from text, and generate documents based on those achievements. We can create highly tailored prompts and AI workflows for each case to make it more likely that our AI will do the right thing. But we also want to support a conversational AI-driven UI, which can achieve most of the things the user can via the UI directly, but with natural language.
That's pretty open-ended - how do we solve this? One powerful tool in our belt is the LLM Router, which is essentially a method where we ask an LLM what kind of message we're dealing with, and then route it to a second LLM call for processing. The first LLM call can be set up to be a general-purpose prompt that understands just enough about your application to be able to delegate to the right tool for the right job.
The secondary LLM calls can be a variety of highly specialized LLM calls or chains of LLM calls that are highly focused on achieving specific objectives. In the example of bragdoc.ai, one of these specialized prompts generates documents based on work achievements.
claudify: fire and forget for Claude Code
Sometimes I find myself doing the same thing over and over again. One of those things looked like this:
- Find that my test suite is failing
- Open up Claude Code
- "Please run
pnpm testand fix the failures" - Wait
Maybe there's only one failing test out of the ~1000 tests in the suite, so we can kinda optimize it a little:
- Look to see which test file was causing the problem
pnpm test /path/to/that/file.test.ts- Open up Claude Code
- Copy/paste the
pnpm test ...command and its output and hit enter - Wait
That's faster as it lets Claude Code focus on a single test file. But it still involved me doing the work of copying and pasting the command and its output. It's a First World Problem of truly quotidian proportions.
What if I could do this instead, and have it be equivalent to all the hard work described above?:
Introducing Task Demon: Vibe Coding with a Plan
In the last 6 months, the way that leading software engineers build software has undergone a fundamental shift.
The adoption of agentic AI coding assistants has heralded the greatest leap in productivity I have encountered in my 20 year career so far. As I wrote previously, adopting Windsurf doubled my output within a week. Where usually I'd be thrilled to find some way to get 20% more done, and would work hard for that 20%, suddenly I'm getting 100% and it's just... easy.
But if there's a single consistent counter-punch to the Vibe Coding movement, it's the irrefutable fact that no matter how good the agentic AI coding assistant is, it will always do much better work from a detailed prompt that includes a plan, than from your 2 sentence vibe code prompt.
That's what Task Demon does: it takes the 2 sentence vibe prompt and blows it up into a sublimely detailed prompt, usually anywhere between 200 and 1000 lines long, that includes a full implementation plan that will correctly guide the AI to do the right thing, using your project's structure, dependencies and ways of doing things.
A video is worth a million words. This one is 15 minutes but if you use AI to build software, I believe you'll find it worth it:
How it works
After using Windsurf and later Claude Code for a while, I found that using the following pattern yielded superb results:
Deep Research Yourself
After 2 years of doing my own thing, I recently got the itch to work on something bigger than myself again and earn some money in the process. After talking to a few interesting companies, I was reminded that hiring engineers is really hard, really time consuming and has a large degree of risk attached to it.
When I think about which company makes the most sense for me to join, I picture myself as a jigsaw piece, with a unique blend of skills, experience and personality traits that you could conceivably draw as a pretty complex jigsaw piece. Each company is also a jigsaw, with a bunch of pieces missing. Just as your shape is unlike anyone elses, so each company's gaps are uniquely shaped as well.
As I plan to do full stack engineering for a company that has a strong AI focus, the jigsaw for a company that might be an optimal fit for me could look like this. Each blue piece is a position the company has already filled, with the blank ones being empty positions they are hiring for:
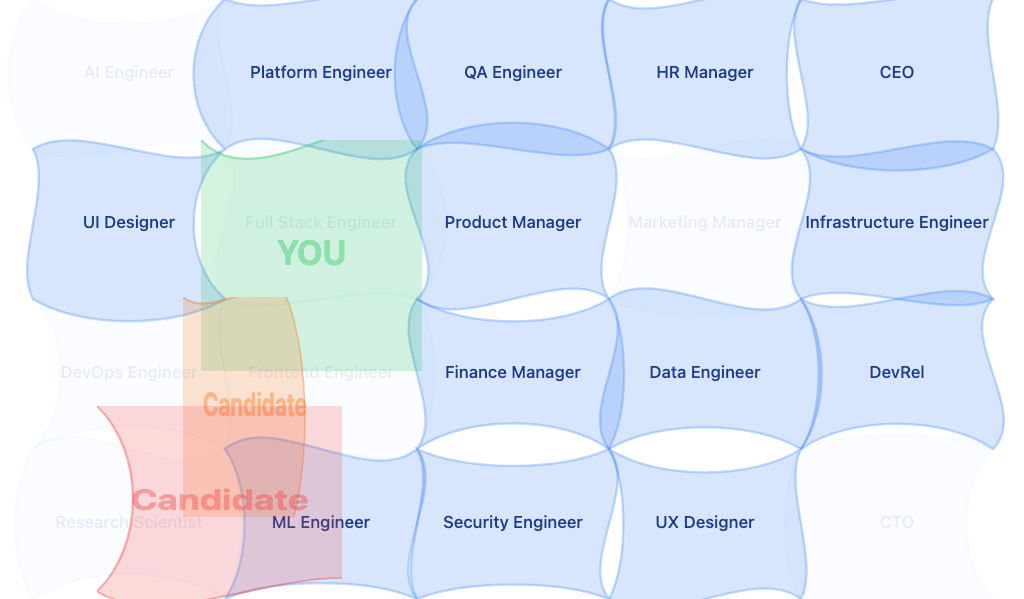
Imagining myself as the green piece and other candidates for the role as the orange and red, this is a company jigsaw where I would have high alignment, because the shape of my puzzle piece fits with the gap in the company jigsaw without missing areas or overlapping too much.
This is a good company to consider joining, with both company and candidate benefitting from the strong alignment. Our orange and red candidates don't fit so well, or overlap too much, so their ability to create value for the company (and therefore themselves) is lower.
When people research you, what do they see?
Thinking from the hiring company's point of view, it's quite a lot of effort to do the research on a candidate. I honestly don't know if the automated candidate screening tooling is good enough to trust yet, but there are 2 things I do know:
- Almost all the information they will gather about you will be from the internet
- You don't get to see a copy of what they find out about you
Eval-Driven Design with NextJS and mdx-prompt
In the previous article, we went on a deep dive into how I use mdx-prompt on bragdoc.ai to write clean, composable LLM prompts using good old JSX. In that article as well as the mdx-prompt announcement article, I promised to talk about Evals and their role in helping you architect and build AI apps that you can actually prove work.
Evals are to LLMs what unit tests are to deterministic code. They are an automated measure of the degree to which your code functions correctly. Unit tests are generally pretty easy to reason about, but LLMs are usually deployed to do non-deterministic and somewhat fuzzy things. How do we test functionality like that?
In the last article we looked at the extract-achievements.ts file from bragdoc.ai, which is responsible for extracting structured work achievement data using well-crafted LLM prompts. Here's a reminder of what that Achievement extract process looks like, with its functions to fetch, render and execute the LLM prompts.
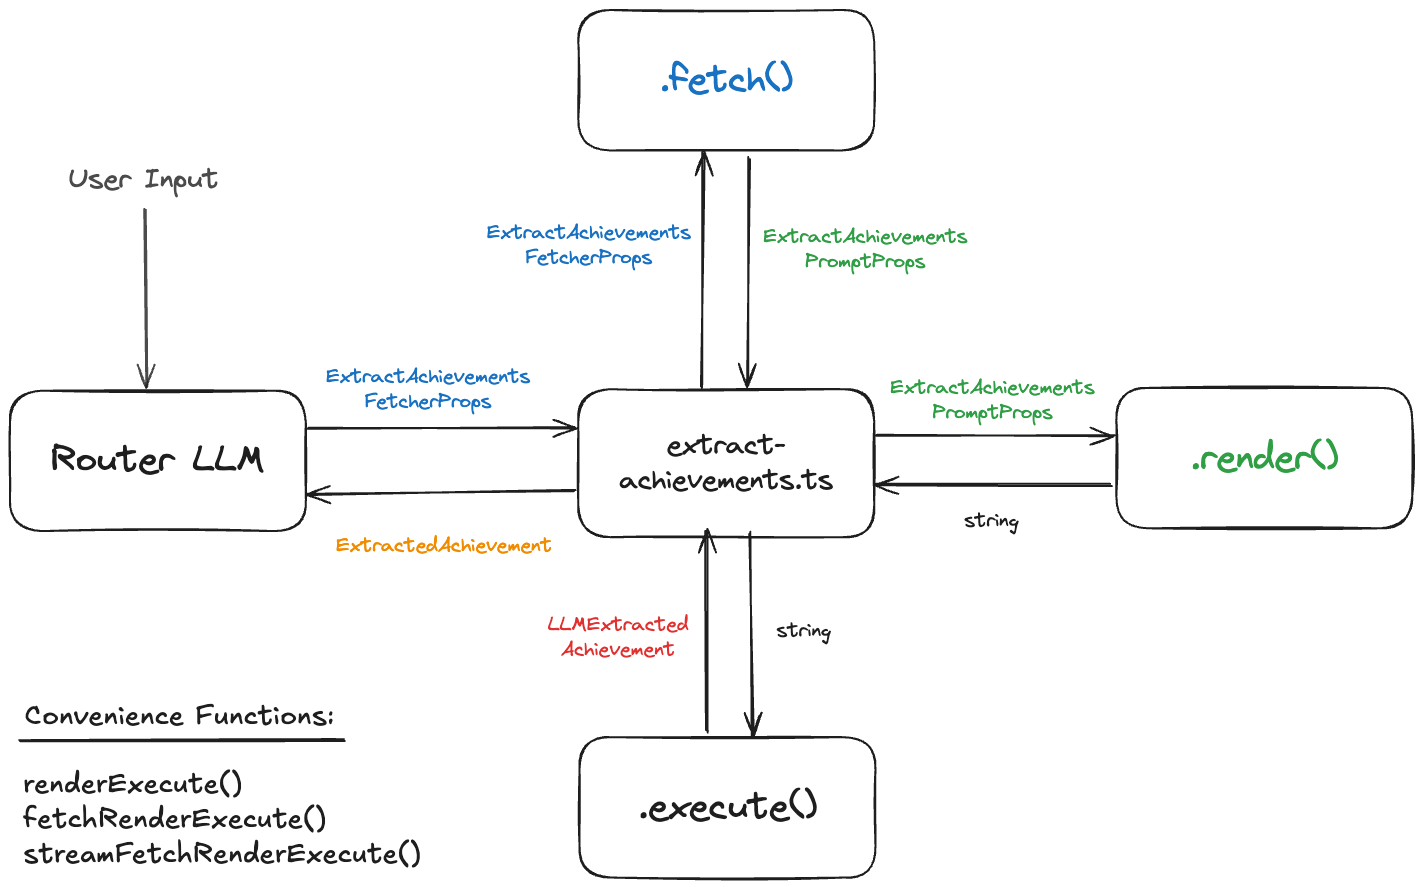
When it comes right down to it, when we say we want to test this LLM integration, what we're trying to test is render() plus execute(), or our convenience function renderExecute. This allows us to craft our own ExtractAchievementsPromptProps and validate that we get reasonable-looking ExtractedAchievement objects back.
ExtractAchievementsPromptProps is just a TS interface that describes all the data we need to render the LLM prompt to extract achievements from a chat session. It looks like this:
mdx-prompt: Real World Example Deep Dive
I just released mdx-prompt, which is a simple library that lets you write familiar React JSX to render high quality prompts for LLMs. Read the introductory article for more general info if you didn't already, but the gist is that we can write LLM Prompts with JSX/MDX like this:
This ought to look familiar to anyone who's ever seen React code. This project was born of a combination of admiration for the way IndyDevDan and others structure their LLM prompts, and frustration with the string interpolation approaches that everyone takes to generating prompts for LLMs.
In the introductory post I go into some details on why string interpolation-heavy functions are not great for prompts. It's a totally natural thing to want to do - once you've started programming against LLM interfaces, you want to start formalizing the mechanism by which you generate the string that is the prompt. Before long you notice that many of your app's prompts have a lot of overlap, and you start to think about how you can reuse the parts that are the same.
Lots of AI-related libraries try to help you here with templating solutions, but they often feel clunky. I really, really wanted to like Langchain, but I lost a day of my life trying to get it to render a prompt that I could have done in 5 minutes with JSX. JSX seems to be a pretty good fit for this problem, and anyone who knows React (a lot of people) can pick it up straight away. mdx-prompt helps React developers compose their LLM prompts with the familiar syntax od JSX.
mdx-prompt: Composable LLM Prompts with JSX
I'm a big fan of IndyDevDan's YouTube channel. He has greatly expanded my thinking when it comes to LLMs. One of the interesting things he does is write many of his prompts with an XML structure, like this:
I really like this structure. Prompt Engineering has been a dark art for a long time. We're suddenly programming using English, which is hilariously imprecise as a programming language, and it feels not quite like "real engineering".
But prompting is actually not programming in English, it's programming in tokens. It just looks like English, so it's easy to fall into the trap of giving it English. But we're not constrained to that at all actually - we can absolutely format our prompts more like XML and reap some considerable rewards:
- It's easier for humans to reason about prompts in this format
- It's easier to reuse content across prompts
- It's easier to have an LLM generate a prompt in this format (see IndyDevDan's metaprompt video)
We've seen this before
I've started migrating many of my prompts to this format, and noticed a few things:
- It organized my thinking around what data the prompt needs
- Many prompts could or should use the same data, but repeat fetching/rendering logic each time
How I built bragdoc.ai in 3 weeks
As we start 2025, it's never been faster to get a SaaS product off the ground. The frameworks, vendors and tools available make it possible to build in weeks what would have taken months or years even just a couple of years ago.
But it's still a lot.
Even when we start from a base template, we still need to figure out our data model, auth, deployment strategy, testing, email sending/receiving, internationalization, mobile support, GDPR, analytics, LLM evals, validation, UX, and a bunch more things:
This morning I launched bragdoc.ai, an AI tool that tracks the work you do and writes things like weekly updates & performance review documents for you. In previous jobs I would keep an achievements.txt file that theoretically kept track of what I worked on each week so that I could make a good case for myself come review time. Bragdoc scratches my own itch by keeping track of that properly with a chatbot who can also make nice reports for me to share with my manager.
But this article isn't much about bragdoc.ai itself, it's about how a product like it can be built in 3 weeks by a single engineer. The answer is AI tooling, and in particular the Windsurf IDE from Codeium.
In fact, this article could easily have been titled "Use Windsurf or Die". I've been in the fullstack software engineering racket for 20 years, and I've never seen a step-change in productivity like the one heralded by Cursor, Windsurf, Repo Prompt and the like. We're in the first innings of a wave of change in how software is built.
NarratorAI: Trainable AI assistant for Node and React
Every word in every article on this site was, for better or worse, written by me: a real human being. Recently, though, I realized that various pages on the site kinda sucked. Chiefly I'm talking about the Blog home page, tag pages like this one for articles tagged with AI and other places where I could do with some "meta-content".
By meta-content I mean content about content, like the couple of short paragraphs that summarize recent posts for a tag, or the outro text that now appears at the end of each post, along with the automatically generated Read Next recommendations that I added recently using ReadNext.
If you go look at the RSC tag, for example, you'll see a couple of paragraphs that summarize what I've written about regarding React Server Components recently. The list of article excerpts underneath it is a lot more approachable with that high-level summary at the top. Without the intro, the page just feels neglected and incomplete.
But the chances of me remembering to update that intro text every time I write a new post about React Server Components are slim to none. I'll write it once, it'll get out of date, and then it will be about as useful as a chocolate teapot. We need a better way. Ideally one that also lets me play by watching the AI stream automatically generated content before my very eyes:
ReadNext: AI Content Recommendations for Node JS
Recently I posted about AI Content Recommendations with TypeScript, which concluded by introducing a new NPM package I've been working on called ReadNext. This post is dedicated to ReadNext, and will go into more detail about how to use ReadNext in Node JS, React, and other JavaScript projects.
What it is
ReadNext is a Node JS package that uses AI to generate content recommendations. It's designed to be easy to use, and can be integrated into any Node JS project with just a few lines of code. It is built on top of LangChain, and delegates to an LLM of your choice for summarizing your content to generate recommendations. It runs locally, does not require you to deploy anything, and has broad support for a variety of content types and LLM providers.
ReadNext is not an AI itself, nor does it want your money, your data or your soul. It's just a library that makes it easy to find related content for developers who use JavaScript as their daily driver. It's best used at build time, and can be integrated into your CI/CD pipeline to generate recommendations for your content as part of your build process.
How to use it
Get started in the normal way:
Configure a ReadNext instance:
Index your content:
AI Content Recommendations with TypeScript
In the last post, we used TypeScript to create searchable embeddings for a corpus of text content and integrated it into a chat bot. But chat bots are the tomato ketchup of AI - great as an accompaniment to something else, but not satisfying by themselves. Given that we now have the tools to vectorize our documents and perform semantic searches against them, let's extend that to generate content recommendations for our readers.
At the bottom of each of my blog articles are links to other posts that may be interesting to the reader based on the current article. The lo-fi way this was achieved was to find all the other posts which overlapped on one or more tags and pick the most recent one.
Quite often that works ok, but I'm sure you can think of ways it could pick a sub-optimal next article. Someone who knows the content well could probably pick better suggestions at least some of the time. LLMs are really well-suited to tasks like this, and should in theory have several advantages over human editors (such as not forgetting what I wrote last week).
We want to end up with some simple UI like this, with one or more suggestions for what to read next:

So how do we figure out which content to recommend based on what you're looking at?
Easy RAG for TypeScript and React Apps
This is the first article in a trilogy that will go through the process of extracting content from a large text dataset - my blog in this case - and making it available to an LLM so that users can get answers to their questions without searching through lots of articles along the way.
Part 1 will cover how to process your text documents for easy consumption by an LLM, throw those embeddings into a vector database, and then use that to help answer the user's questions. There are a million articles about this using Python, but I'm principally a TypeScript developer so we'll focus on TS, React and NextJS.
Part 2 covers how to make an AI-driven "What to Read Next" component, which looks at the content of an document (or blog post, in this case) and performs a semantic search through the rest of the content to rank which other posts are most related to this one, and suggest them.
Part 3 will extend this idea by using InformAI to track which articles the user has looked at and attempt to predictively generate suggested content for that user, personalizing the What to Read Next component while keeping the reader completely anonymous to the system.
Let's RAG
About a week ago I released InformAI, which allows you to easily surface the state of your application UI to an LLM in order to help it give more relevant responses to your user. In that intro post I threw InformAI into the blog post itself, which gave me a sort of zero-effort poor man's RAG, as the LLM could see the entire post and allow people to ask questions about it.
That's not really what InformAI is intended for, but it's nice that it works. But what if we want to do this in a more scalable and coherent way? This blog has around 100 articles, often about similar topics. Sometimes, such as when I release open source projects like InformAI, it's one of the only sources of information on the internet about the given topic. You can't ask ChatGPT what InformAI is, but with a couple of tricks we can transparently give ChatGPT access to the answer so that it seems like it magically knows stuff it was never trained on.
Blending Markdown and React components in NextJS
Authoring long-form content like blog posts is a pleasant experience with Markdown as it lets you focus on the content without worrying about the presentation or making the browser happy. Spamming <p> and <div> tags all over the place is a PITA and serves as a distraction from the content you're working on.
However, in a blog like this one, which deals with a lot of React/node/nextjs content, static text and images are limiting. We really want our React components to be live on the page with all of the richness and composability that React and JSX bring - so how do we blend the best of both of these worlds?
MDX: Markdown plus React
MDX is an extension to Markdown that also allows you to import and use React components. It lets you write content like this:
That's rendering an <Aside> component, which is a simple React component I use in some of my posts and looks like this:
That's really cool, and we can basically use any React component(s) we like here. But first let's talk a little about metadata.
Introducing InformAI - Easy & Useful AI for React apps
Most web applications can benefit from AI features, but adding AI to an existing application can be a daunting prospect. Even a moderate-sized React application can have hundreds of components, spread across dozens of pages. Sure, it's easy to tack a chat bot in the bottom corner, but it won't be useful unless you integrate it with your app's contents.
This is where InformAI comes in. InformAI makes it easy to surface all the information that you already have in your React components to an LLM or other AI agent. With a few lines of React code, your LLM can now see exactly what your user sees, without having to train any models, implement RAG, or any other expensive setup.
InformAI is not an AI itself, it just lets you expose components and UI events via the simple <InformAI /> component. Here's how we might add AI support to a React component that shows a table of a company's firewalls:
Error handling and retry with React Server Components
React Server Components are a game-changer when it comes to building large web applications without sending megabytes of JavaScript to the client. They allow you to render components on the server and stream them to the client, which can significantly improve the performance of your application.
However, React Server Components can throw errors, just like regular React components. In this article, we'll explore how to handle and recover from errors in React Server Components.
Error boundaries
In React, you can use error boundaries to catch errors that occur during rendering, in lifecycle methods, or in constructors of the whole tree below them. An error boundary is a React component that catches JavaScript errors anywhere in its child component tree and logs those errors, displaying a fallback UI instead of crashing the entire application.
To create an error boundary in React, you need to define a component that implements the componentDidCatch lifecycle method. This method is called whenever an error occurs in the component tree below the error boundary.
Promises across the void: Streaming data with RSC
Last week we looked at how React Server Component Payloads work under the covers. Towards the end of that article I mentioned a fascinating thing that you can do with RSC: sending unresolved promises from the server to the client. When I first read that I thought it was a documentation bug, but it's actually quite real (though with some limitations).
Here's a simple example of sending a promise from the server to the client. First, here's our server-rendered component, called SuspensePage in this case:
So we just imported a getData() function that returns a promise that resolves after 1 second. This simulates a call to a database or other asynchronous action. Here's our fake getData() function:
Decoding React Server Component Payloads
If you've spent any time playing with React Server Components, you've probably noticed a bunch of stuff like this at the bottom of your web pages:
You may be wondering what this all means. It's not super well documented, and all pretty bleeding-edge. It's not likely to be something you need to worry about in your day-to-day work, but if you're a curious geek like me, read on.
What you're looking at is a bunch of <script> tags automatically injected into the end of the page. The content above is a copy-paste from just about the most basic Next JS application imaginable. It consists of 2 components - a layout.tsx and a page.tsx:
Teams using Next.js and Vercel have an advantage
During my time at Palo Alto Networks, I spent most of my time working on a product called AutoFocus. It helped cyber security research teams analyze files traversing our firewalls for signs of malware. It was pretty cool, fronted by a large React application, with a bunch of disparate backend services and databases scattered around.
One of the things that was difficult to do was deploy our software. We were on a roughly 3 month release cycle to begin with, which meant several things:
- Out-of-band bug fix releases were expensive
- We didn't get much practice deploying, so when we did, it was a team effort, error prone and took a long time.
- Trying to estimate and scope 3 months of work for a team of 10 is a fool's errand
Deployment meant getting most of the team into a war room, manually uploading build files to various places, doing a sort of canary deploy, seeing if things seemed ok, then rolling out to the rest of the world. Sometimes we decided to roll out architectural changes to reverse proxies and things at the same time, just for fun.
The best hardware setup for software engineers
When I'm writing software I usually have the following windows open, all at the same time:
- 2 column layout VS Code (window = 2560 x 2160)
- A fullscreen-equivalent browser with usable console to see what I'm working on (window = 1920 x 2160)
- A large terminal window (window = 2560 x 1440)
- Chat GPT (window = 2560 x 1440)
- A full-screen browser with all the stuff I'm researching (window = 2560 x 2880)
I find tabbing between windows to be a great destroyer of productivity, so I've spent a good deal of time and money over the last few years iterating on a hardware setup that lets me see everything at once. Today, it looks like this:

I went through a number of iterations when it comes to monitors. For a long time I used dual 32" 4K IPS screens, but even that wasn't quite enough pixels. It's hard to physically fit more than 2 32" screens on a desk - they're too wide already, and it would not be ergonomic to mount them above each other.
Loading Fast and Slow: async React Server Components and Suspense
When the web was young, HTML pages were served to clients running web browser software that would turn the HTML text response into rendered pixels on the screen. At first these were static HTML files, but then things like PHP and others came along to allow the server to customize the HTML sent to each client.
CSS came along to change the appearance of what got rendered. JavaScript came along to make the page interactive. Suddenly the page was no longer the atomic unit of the web experience: pages could modify themselves right there inside the browser, without the server being in the loop at all.
This was good because the network is slow and less than 100% reliable. It heralded a new golden age for the web. Progressively, less and less of the HTML content was sent to clients as pre-rendered HTML, and more and more was sent as JSON data that the client would render into HTML using JavaScript.
This all required a lot more work to be done on the client, though, which meant the client had to download a lot more JavaScript. Before long we were shipping MEGABYTES of JavaScript down to the web browser, and we lost the speediness we had gained by not reloading the whole page all the time. Page transitions were fast, but the initial load was slow. Megabytes of code shipped to the browser can multiply into hundreds of megabytes of device memory consumed, and not every device is your state of the art Macbook Pro.
Single Page Applications ultimately do the same thing as that old PHP application did - render a bunch of HTML and pass it to the browser to render. The actual rendered output is often a few kilobytes of plain text HTML, but we downloaded, parsed and executed megabytes of JavaScript to generate those few kilobytes of HTML. What if there was a way we could keep the interactivity of a SPA, but only send the HTML that needs to be rendered to the client?
Using Server Actions with Next JS
React and Next.js introduced Server Actions a while back, as a new/old way to call server-side code from the client. In this post, I'll explain what Server Actions are, how they work, and how you can use them in your Next.js applications. We'll look at why they are and are not APIs, why they can make your front end code cleaner, and why they can make your backend code messier.
Everything old is new again
In the beginning, there were <form>s. They had an action, and a method, and when you clicked the submit button, the browser would send a request to the server. The server would then process the request and send back a response, which could be a redirect. The action was the URL of the server endpoint, and the method was usually either GET or POST.
Then came AJAX, and suddenly we could send requests to the server without reloading the page. This was a game-changer, and it opened up a whole new world of possibilities for building web applications. But it also introduced a lot of complexity, as developers had to manage things like network requests, error handling, and loading states. We ended up building React components like this:
This code is fine, but it's a lot of boilerplate for something as simple as submitting a form. It's also not very readable, as the logic for handling the form submission is mixed in with the UI code. Wouldn't it be nice if we could go back to the good old days of <form>s, but without the page reload?
Avoiding Catastrophe by Automating OPNSense Backups
tl;dr: a Backups API exists for OPNSense. opnsense-autobackup uses it to make daily backups for you.
A few months ago I set up OPNSense on my home network, to act as a firewall and router. So far it's been great, with a ton of benefits over the eero mesh system I was replacing - static DHCP assignments, pretty local host names via Unbound DNS, greatly increased visibility and monitoring possibilities, and of course manifold security options.
However, it's also become a victim of its own success. It's now so central to the network that if it were to fail, most of the network would go down with it. The firewall rules, VLAN configurations, DNS setup, DHCP etc are all very useful and very endemic - if they go away most of my network services go down: internet access, home automation, NAS, cameras, more.
OPNSense lets you download a backup via the UI; sometimes I remember to do that before making a sketchy change, but I have once wiped out the box without a recent backup, and ended up spending several hours getting things back up again. That was before really embracing things like local DNS and static DHCP assignments, which I now have a bunch of automation and configuration reliant on.
Automating a Home Theater with Home Assistant

I built out a home theater in my house a couple of years ago, in what used to be a bedroom. From the moment it became functional, we started spending most evenings in there, and got into the rhythm of how to turn it all on:
- Turn on the receiver, make sure it's on the right channel
- Turn on the ceiling fan at the right setting
- Turn on the lights just right
- Turn on the projector, but not too soon or it will have issues
- Turn on the Apple TV, which we consume most of our content on
Not crazy difficult, but there is a little dance to perform here. Turning on the projector too soon will make it never be able to talk to the receiver for some reason (probably to prevent me from downloading a car), so it has to be delayed the right number of seconds otherwise you have to go through a lengthy power cycle to get it to work.
It also involves the location of no fewer than 5 remote controls, 3 of which use infrared. The receiver is hidden away in a closet, so you had to go in there to turn that on, remote control or no. Let's see if we can automate this so you can turn the whole thing on with a single button.
How to make Bond fans work better with Home Assistant
I have a bunch of these nice Minka Aire fans in my house:

They're nice to look at and, crucially, silent when running (so long as the screws are nice and tight). They also have some smart home capabilities using the Smart by Bond stack. This gives us a way to integrate our fans with things like Alexa, Google Home and, in my case, Home Assistant.
Connecting Bond with Home Assistant
In order to connect anything to these fans you need a Bond WIFI bridge. This is going to act as the bridge between your fans and your network. Once you've got it set up and connected to your wifi network, you'll need to figure out what IP it is on. You can send a curl request to the device to get the Access Token that you will need to be able to add it to Home Assistant:
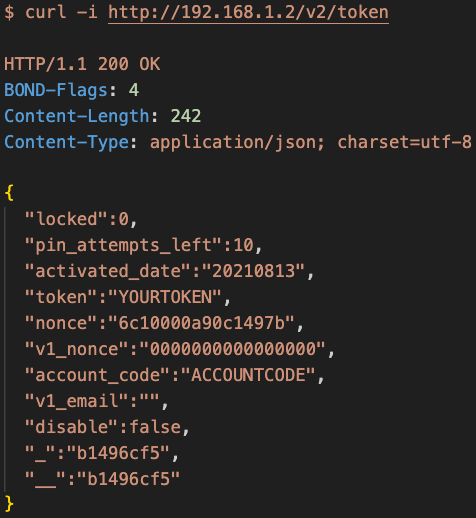
If you get an access denied error, it's probably because the Bond bridge needs a proof of ownership signal. The easiest way to do that is to just power off the bridge and power it on again - run the curl again within 10 minutes of the bridge coming up and you'll get your token.
Demystifying OpenAI Assistants - Runs, Threads, Messages, Files and Tools
As I mentioned in the previous post, OpenAI dropped a ton of functionality recently, with the shiny new Assistants API taking center stage. In this release, OpenAI introduced the concepts of Threads, Messages, Runs, Files and Tools - all higher-level concepts that make it a little easier to reason about long-running discussions involving multiple human and AI users.
Prior to this, most of what we did with OpenAI's API was call the chat completions API (setting all the non-text modalities aside for now), but to do so we had to keep passing all of the context of the conversation to OpenAI on each API call. This means persisting conversation state on our end, which is fine, but the Assistants API and related functionality makes it easier for developers to get started without reinventing the wheel.
OpenAI Assistants
An OpenAI Assistant is defined as an entity with a name, description, instructions, default model, default tools and default files. It looks like this:
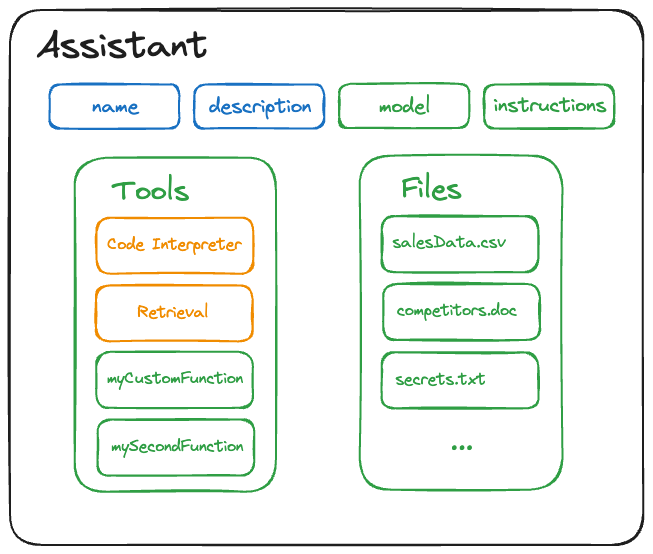
Let's break this down a little. The name and description are self-explanatory - you can change them later via the modify Assistant API, but they're otherwise static from Run to Run. The model and instructions fields should also be familiar to you, but in this case they act as defaults and can be easily overridden for a given Run, as we'll see in a moment.
Using ChatGPT to generate ChatGPT Assistants
OpenAI dropped a ton of cool stuff in their Dev Day presentations, including some updates to function calling. There are a few function-call-like things that currently exist within the Open AI ecosystem, so let's take a moment to disambiguate:
- Plugins: introduced in March 2023, allowed GPT to understand and call your HTTP APIs
- Actions: an evolution of Plugins, makes it easier but still calls your HTTP APIs
- Function Calling: Chat GPT understands your functions, tells you how to call them, but does not actually call them
It seems like Plugins are likely to be superseded by Actions, so we end up with 2 ways to have GPT call your functions - Actions for automatically calling HTTP APIs, Function Calling for indirectly calling anything else. We could call this Guided Invocation - despite the name it doesn't actually call the function, it just tells you how to.
That second category of calls is going to include anything that isn't an HTTP endpoint, so gives you a lot of flexibility to call internal APIs that never learned how to speak HTTP. Think legacy systems, private APIs that you don't want to expose to the internet, and other places where this can act as a highly adaptable glue.
Distributed Tracing with Node JS
The microservice architecture pattern solves many of the problems inherent with monolithic applications. But microservices also bring challenges of their own, one of which is figuring out what went wrong when something breaks. There are at least 3 related challenges here:
- Log collection
- Metric collection
- Distributed tracing
Log and metric collection is fairly straightforward (we'll cover these in a separate post), but only gets you so far.
Let's say your 20 microservice application starts behaving badly - you start getting timeouts on a particular API and want to find out why. The first place you look may be your centralized metrics service. This will likely confirm to you that you have a problem, as hopefully you have one or more metrics that are now showing out-of-band numbers.
But what if the issue only affects part of your user population, or worse, a single (but important) customer? In these cases your metrics - assuming you have the right ones in the first place - probably won't tell you much.
Older Articles
2010-2020
- A New Stack for 2016: Getting Started with React, ES6 and Webpack
- Jasmine and Jenkins Continuous Integration
- Sencha Con 2013 Wrapup
- Sencha Con Attendees: I Need You
- Sencha Con 2013: Ext JS Performance tips
- Sencha Con 2013: Fastbook
- Sencha Con 2013 Day 1
- Autotesting JavaScript with Jasmine and Guard
- On Leaving Sencha
- Anatomy of a Sencha Touch 2 App
- What do you want from Sencha Touch 2.1?
- Sencha Touch 2 GA Released!
- Building a data-driven image carousel with Sencha Touch 2
- Like Android? Help us fix it
- Sencha Touch 2 Hits Beta
- The Class System in Sencha Touch 2 - What you need to know
- Sencha Touch 2 PR4 - Big Improvements in Data and MVC
- SenchaCon 2011: The Best Bits
- Ext JS 4.0.7 Released
- Sencha Touch 2 - Thoughts from the Trenches
- SourceDevCon 2011 - an awesome conference
- Proxies in Ext JS 4
- Introduction to Ext JS 4
- Ext JS 4: The Class Definition Pipeline
- Classes in Ext JS 4: Under the hood
- Sencha Touch tech talk at Pivotal Labs
- Using the Ext JS PivotGrid
- Offline Apps with HTML5: A case study in Solitaire
- Writing Compressible JavaScript
- Ext JS 3.2 beta out today
- Answering Nicholas Zakas' JavaScript quiz
- Jaml updates
- Ext JS is looking for a QA rockstar
- 2010: The year Ext JS takes over
2012
- On Leaving Sencha
- Anatomy of a Sencha Touch 2 App
- What do you want from Sencha Touch 2.1?
- Sencha Touch 2 GA Released!
- Building a data-driven image carousel with Sencha Touch 2
- Like Android? Help us fix it
- Sencha Touch 2 Hits Beta
- The Class System in Sencha Touch 2 - What you need to know
- Sencha Touch 2 PR4 - Big Improvements in Data and MVC
2011
2009
- OSX Screensaver emulation with Canvas: That's Bean
- Ext.ux.Exporter - export any Grid to Excel or CSV
- Jaml: beautiful HTML generation for JavaScript
- Making RowEditor use your column renderers
- git: what to do if you commit to no branch
- Writing Better JavaScript - split up long methods
- JavaScript Module pattern - overused, dangerous and bloody annoying
- ExtJS modules and mixins
- Ext.ux.layout.FillContainer
- JavaScript FizzBuzz in a tweet
- Using the ExtJS Row Editor
- Moving from Blogger to Wordpress
- The trouble with new
- Ext.decorate
- Ext.ux.Printer - printing for any ExtJS Component
- ExtJS grid page size - letting the user decide
- Printing grids with Ext JS
- Ext.override - Monkey Patching Ext JS
- Ext JS iterator functions
- Read my BDD article in this month's JS Magazine
- Darwin, Humanism and Science
- 'function' in JavaScript - operator vs statement
- The case for Ext.applyOnly
- Force Ext.data.Store to use GET
- Adding a loading mask to your ExtJS application
- Why you should be using History in your ExtJS applications
- ExtJS Solitaire
- ExtJS Textmate bundle
- Using Ext.History
- Custom containers with ExtJS
2008
- JavaScript bra size calculator
- Weird bug preventing ExtJS checkboxes from submitting properly
- How Ext.apply works, and how to avoid a big headache
- Don't forget the wurst
- DRYing up your CRUD controller RSpecs
- Cleaning up an example Ext JS form
- ExtJS Radio Buttons and Square Brackets
- When Git tells you it failed to push some refs
- Git clone vs Git submodule
- Useful Rails javascript expansions for EXTJS
- EXT remote-loading forms with Combo boxes
- Getting EXT PagingToolbars to save state
- Rails asset tag expansions