This evening I embarked on a little stellar voyage that I'd like to share with you all. Most people with great taste love astronomy and Sencha Touch 2, so why not combine them in a fun evening's web app building?
NASA has been running a small site called APOD (Astronomy Picture Of the Day) for a long time now, as you can probably tell by the awesome web design of that page. Despite its 1998-era styling, this site incorporates some pretty stunning images of the universe and is begging for a mobile app interpretation.
We're not going to go crazy, in fact this whole thing only took about an hour to create, but hopefully it's a useful look at how to put something like this together. In this case, we're just going to write a quick app that pulls down the last 20 pictures and shows them in a carousel with an optional title.
Here's what it looks like live. You'll need a webkit browser (Chrome or Safari) to see this, alternatively load up http://code.edspencer.net/apod on a phone or tablet device:
The full source code for the app is up on github, and we'll go through it bit by bit below.
The App
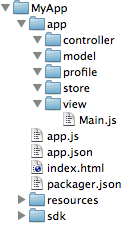
Our app consists of 5 files:
- index.html, which includes our JavaScript files and a little CSS
- app.js, which boots our application up
- app/model/Picture.js, which represents a single APOD picture
- app/view/Picture.js, which shows a picture on the page
- app/store/Pictures.js, which fetches the pictures from the APOD RSS feed
The whole thing is up on github and you can see a live demo at http://code.edspencer.net/apod. To see what it's doing tap that link on your phone or tablet, and to really feel it add it to your homescreen to get rid of that browser chrome.
The Code
Most of the action happens in app.js, which for your enjoyment is more documentation than code. Here's the gist of it:
/*
 * This app uses a Carousel and a JSON-P proxy so make sure they're loaded first
 */
Ext.require([
    'Ext.carousel.Carousel',
    'Ext.data.proxy.JsonP'
]);

/**
 * Our app is pretty simple - it just grabs the latest images from NASA's Astronomy Picture Of the Day
 * (http://apod.nasa.gov/apod/astropix.html) and displays them in a Carousel. This file drives most of
 * the application, but there's also:
 *
 * * A Store - app/store/Pictures.js - that fetches the data from the APOD RSS feed
 * * A Model - app/model/Picture.js - that represents a single image from the feed
 * * A View - app/view/Picture.js - that displays each image
 *
 * Our application's launch function is called automatically when everything is loaded.
 */
Ext.application({
    name: 'apod',

    models: ['Picture'],
    stores: ['Pictures'],
    views: ['Picture'],

    launch: function() {
        var titleVisible = false,
            info, carousel;

        /**
         * The main carousel that drives our app. We're just telling it to use the Pictures store and
         * to update the info bar whenever a new image is swiped to
         */
        carousel = Ext.create('Ext.Carousel', {
            store: 'Pictures',
            direction: 'horizontal',

            listeners: {
                activeitemchange: function(carousel, item) {
                    info.setHtml(item.getPicture().get('title'));
                }
            }
        });

        /**
         * This is just a reusable Component that we pin to the top of the page. This is hidden by default
         * and appears when the user taps on the screen. The activeitemchange listener above updates the
         * content of this Component whenever a new image is swiped to
         */
        info = Ext.create('Ext.Component', {
            cls: 'apod-title',
            top: 0,
            left: 0,
            right: 0
        });

        //add both of our views to the Viewport so they're rendered and visible
        Ext.Viewport.add(carousel);
        Ext.Viewport.add(info);

        /**
         * The Pictures store (see app/store/Pictures.js) is set to not load automatically, so we load it
         * manually now. This loads data from the APOD RSS feed and calls our callback function once it's
         * loaded.
         *
         * All we do here is iterate over all of the data, creating an apodimage Component for each item.
         * Then we just add those items to the Carousel and set the first item active.
         */
        Ext.getStore('Pictures').load(function(pictures) {
            var items = [];

            Ext.each(pictures, function(picture) {
                if (!picture.get('image')) {
                    return;
                }

                items.push({
                    xtype: 'apodimage',
                    picture: picture
                });
            });

            carousel.setItems(items);
            carousel.setActiveItem(0);
        });

        /**
         * The final thing is to add a tap listener that is called whenever the user taps on the screen.
         * We do a quick check to make sure they're not tapping on the carousel indicators (tapping on
         * those indicators moves you between items so we don't want to override that), then either hide
         * or show the info Component.
         *
         * Note that to hide or show this Component we're adding or removing the apod-title-visible class.
         * If you look at index.html you'll see the CSS rules style the info bar and also cause it to fade
         * in and out when you tap.
         */
        Ext.Viewport.element.on('tap', function(e) {
            if (!e.getTarget('.x-carousel-indicator')) {
                if (titleVisible) {
                    info.element.removeCls('apod-title-visible');
                    titleVisible = false;
                } else {
                    info.element.addCls('apod-title-visible');
                    titleVisible = true;
                }
            }
        });
    }
});
This is pretty simple stuff and you can probably just follow the comments to see what's going on. Basically though the app.js is responsible for launching our application, creating the Carousel and info Components, and setting up a couple of convenient event listeners.
We also had a few other files:
Picture Model
Found in app/model/Picture.js, our model is mostly just a list of fields sent back in the RSS feed. There is one that's somewhat more complicated than the rest though - the 'image' field. Ideally, the RSS feed would have sent back the url of the image in a separate field and we could just pull it out like any other, but alas it is embedded inside the main content.
To get around this, we just specify a convert function that grabs the content field, finds the first image url inside of it and pulls it out. To make sure it looks good on any device we also pass it through Sencha IO src, which resizes the image to fit the screen size of whatever device we happen to be viewing it on:
/**
 * Simple Model that represents an image from NASA's Astronomy Picture Of the Day. The only remarkable
 * thing about this model is the 'image' field, which uses a regular expression to pull its value out
 * of the main content of the RSS feed. Ideally the image url would have been presented in its own field
 * in the RSS response, but as it wasn't we had to use this approach to parse it out
 */
Ext.define('apod.model.Picture', {
    extend: 'Ext.data.Model',

    config: {
        fields: [
            'id', 'title', 'link', 'author', 'content',
            {
                name: 'image',
                type: 'string',
                convert: function(value, record) {
                    var content = record.get('content'),
                        regex   = /img src=\"([a-zA-Z0-9\_\.\/\:]*)\"/,
                        match   = content.match(regex),
                        src     = match[1];

                    if (src != "" && !src.match(/\.gif$/)) {
                        src = "http://src.sencha.io/screen.width/" + src;
                    }

                    return src;
                }
            }
        ]
    }
});
Pictures Store
Our Store is even simpler than our Model. All it does is load the APOD RSS feed over JSON-P (via Google's RSS Feed API) and decode the data with a very simple JSON Reader. This automatically pulls down the images and runs them through our Model's convert function:
/**
 * Grabs the APOD RSS feed from Google's Feed API, passes the data to our Model to decode
 */
Ext.define('apod.store.Pictures', {
    extend: 'Ext.data.Store',

    config: {
        model: 'apod.model.Picture',

        proxy: {
            type: 'jsonp',
            url: 'https://ajax.googleapis.com/ajax/services/feed/load?v=1.0&q=http://www.acme.com/jef/apod/rss.xml&num=20',

            reader: {
                type: 'json',
                rootProperty: 'responseData.feed.entries'
            }
        }
    }
});
Tying it all together
Our app.js loads our Model and Store, plus a really simple Picture view that is basically just an Ext.Img. All it does then is render the Carousel and Info Component to the screen and tie up a couple of listeners.
In case you weren't paying attention before, the info component is just an Ext.Component that we rendered up in app.js as a place to render the title of the image you're currently looking at. When you swipe between items in the carousel the activeitemchange event is fired, which we listen to near the top of app.js. All our activeitemchange listener does is update the HTML of the info component to the title of the image we just swiped to.
But what about the info component itself? Well at the bottom of app.js we added a tap listener on Ext.Viewport that hides or shows the info Component whenever you tap anywhere on the screen (except if you tap on the Carousel indicator icons). With a little CSS transition loveliness we get a nice fade in/out transition when we tap the screen to reveal the image title. Here's that tap listener again:
/**
 * The final thing is to add a tap listener that is called whenever the user taps on the screen.
 * We do a quick check to make sure they're not tapping on the carousel indicators (tapping on
 * those indicators moves you between items so we don't want to override that), then either hide
 * or show the info Component.
 */
Ext.Viewport.element.on('tap', function(e) {
    if (!e.getTarget('.x-carousel-indicator')) {
        if (titleVisible) {
            info.element.removeCls('apod-title-visible');
            titleVisible = false;
        } else {
            info.element.addCls('apod-title-visible');
            titleVisible = true;
        }
    }
});
The End of the Beginning
This was a really simple app that shows how easy it is to put these things together with Sencha Touch 2. Like with most stories though there's more to come so keep an eye out for parts 2 and 3 of this intergalactic adventure.