The Class System in Sencha Touch 2 - What you need to know
Sencha Touch 1 used the class system from Ext JS 3, which provides a simple but powerful inheritance
At its simplest, a Sencha Touch 2 application is just a small collection of text files - html, css and javascript. But applications often grow over time so to keep things organized and maintainable we have a set of simple conventions around how to structure and manage your application's code.
A little while back we introduced a technology called Sencha Command. Command got a big overhaul for 2.0 and today it can generate all of the files your application needs for you. To get Sencha Command you'll need to install the SDK Tools and then open up your terminal. To run the app generator you'll need to make sure you've got a copy of the Sencha Touch 2 SDK, cd into it in your terminal and run the app generate command:
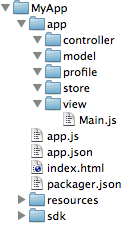
This creates an application called MyApp with all of the files and folders you'll need to get started generated for you. You end up with a folder structure that looks like this:

This looks like a fair number of files and folders because I've expanded the app folder in the image above but really there are only 4 files and 3 folders at the top level. Let's look at the files first:
To begin with you'll only really need to edit app.js - the others come in useful later on. Now let's take a look at the folders:
You'll spend 90%+ of your time inside the app folder, so let's drill down and take a look at what's inside that. We've got 5 subfolders, all of which are empty except one - the view folder. This just contains a template view file that renders a tab panel when you first boot the app up. Let's look at each:
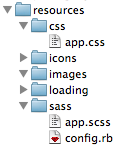
Moving on, let's take a look at the resources folder:

Five folders this time - in turn:
There are quite a few icon and loading images needed to cover all of the different sizes and resolutions of the devices that Sencha Touch 2 supports. We've included all of the different formats with the conventional file names as a guide - you can just replace the contents of resources/icons and resources/loading with your own images.
Finally there's the SDK directory, which contains the SDK's source code and all of the dependencies used by Sencha Command. This includes Node.js, Phantom JS and others so it can start to add up. Of course, none of this goes into your production builds, which we keep as tiny and fast-loading as possible, but if you're not going to use the SDK Tools (bad move, but your call!) you can remove the sdk/command directory to keep things leaner.
By vendoring all third-party dependencies like Node.js into your application directory we can be confident that there are no system-specific dependencies required, so you can zip up your app, send it to a friend and so long as she has the SDK Tools installed, everything should just work.
Hopefully that lays out the large-scale structure of what goes where and why - feel free to ask questions!
For further exploration of Sencha Touch 2, consider reading The Class System in Sencha Touch 2 - What you need to know, which discusses significant improvements in class structures and how they enhance app development. Additionally, you might find Sencha Touch 2 Hits Beta useful for understanding the advancements made in the framework, such as improved performance and new features.
Sencha Touch 1 used the class system from Ext JS 3, which provides a simple but powerful inheritance
Earlier today we released Sencha Touch 2 Beta 1 - check out the official sencha.com blog post and re
I recently gave an introduction to Sencha Touch talk up at Pivotal Labs in San Francisco. The guys a
The last few months have flown by faster than almost any before them. The first Sencha Touch 2 relea