Autotesting JavaScript with Jasmine and Guard
One of the things I really loved about Rails in the early days was that it introduced me to the conc
I use Jasmine as my JavaScript unit/behavior testing framework of choice because it's elegant and has a good community ecosystem around it. I recently wrote up how to get Jasmine-based autotesting set up with Guard, which is great for development time testing, but what about continuous integration?
Well, it turns out that it's pretty difficult to get Jasmine integrated with Jenkins. This is not because of an inherent problem with either of those two, it's just that no-one got around to writing an open source integration layer until now.
The main problem is that Jasmine tests usually expect to run in a browser, but Jenkins needs results to be exposed in .xml files. Clearly we need some bridge here to take the headless browser output and dump it into correctly formatted .xml files. Specifically, these xml files need to follow the JUnit XML file format for Jenkins to be able to process them. Enter guard-jasmine.
In my previous article on getting Jasmine and Guard set up, I was using the jasmine-headless-webkit and guard-jasmine-headless-webkit gems to provide the glue. Since then I've replaced those 2 gems with a single gem - guard-jasmine, written by Michael Kessler, the Guard master himself. This simplifies our dependencies a little, but doesn't buy us the .xml file functionality we need.
For that, I had to hack on the gem itself (which involved writing coffeescript for the first time, which was not a horrible experience). The guard-jasmine gem now exposes 3 additional configurations:
The JUnit Xml reporter itself borrows heavily from larrymyers' excellent jasmine-reporters project. Aside from a few changes to integrate it into guard-jasmine it's the same code, so all credit goes to to Larry and Michael.
In your Guardfile:
This will just run the full set of Jasmine tests inside your spec/javascripts directory whenever any test, source file or asset like CSS files change. This is generally the configuration I use because the tests execute so fast I can afford to have them all run every time.
In the example above we set the :junit_save_path to 'reports', which means it will save all of the .xml files into the reports directory. It is going to output 1 .xml file for each Jasmine spec file that is run. In each case the name of the .xml file created is based on the name of the top-level describe block in your spec file.
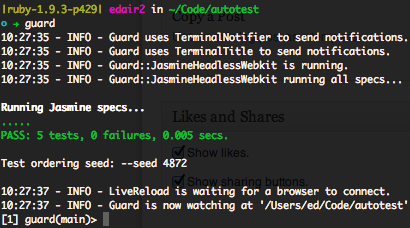
To test that everything's working, just run bundle exec guard as you normally would, and check to see that your reports folder now contains a bunch of .xml files. If it does, everything went well.
Once we've got the .xml files outputting correctly, we just need to tell Jenkins where to look. In your Jenkins project configuration screen, click the Add Build Step button and add a "Publish JUnit test result report" step. Enter 'reports/*.xml' as the Test report XMLs field.
If you've already got Jenkins running your test script then you're all done. Next time a build is triggered the script should run the tests and export the .xml files. If you don't already have Jenkins set up to run your tests, but you did already set up Guard as per my previous article, you can actually use the same command to run the tests on Jenkins.
After a little experimentation, people tend to come up with a build command like this:
If you're using rvm and need to guarantee a particular version you may need to prepend an rvm install command before bundle install is called. This should just run guard, which will dump the files out as expected for Jenkins to pick up.
To clean up, we'll just add a second post-build action, this time choosing the "Execute a set of scripts" option and entering the following:
This just kills the Guard process, which ordinarily stays running to power your autotest capabilities. Once you run a new build you should see a chart automatically appear on your Jenkins project page telling you full details of how many tests failed over time and in the current build.
Update: The Pull Request is now merged into the main guard-jasmine repo so you can just use gem 'guard-jasmine' in your Gemfile
For a deeper understanding of how to streamline your JavaScript testing workflow, you might find the step-by-step process detailed in Autotesting JavaScript with Jasmine and Guard particularly useful. Additionally, exploring Read my BDD article in this month's JS Magazine will offer insights into the broader applications of Behavior Driven Development (BDD) in JavaScript projects.
One of the things I really loved about Rails in the early days was that it introduced me to the conc
I have an article on Behaviour Driven Development for JavaScript in June's edition of the excellent
If you're using Edge Rails (or > 2.1, which isn't out at time of writing), and are using the EXT
If you're using edge rails you may have noticed that you can now define your own JavaScript expansio
herdctl runs Claude Code agents securely in Docker, with schedules and chat
Learn moreAI-powered work documentation for career advancement
Start free demoherdctl runs Claude Code agents securely in docker, with optional schedules and chat
→ Read moremdx-prompt lets you write reusable and composable LLM prompts using JSX
→ Read morebragdoc.ai is an open source Next JS AI SaaS app for tracking your work
→ Read morereact-auto-intl automatically internationalizes and translates React and Next JS apps
→ Read moreNarratorAI creates AI-powered content like intros and search result summaries
→ Read moreInformAI allows AI to access and understand the information in your React components
→ Read moreReadNext creates AI-powered content recommendations for your blog or other content
→ Read moreI've built things on the web for 20 years, and used JavaScript before it was cool.
I've been working for myself since early 2023, going wherever my heart takes me - mostly playing with AI and UI.