Loading Fast and Slow: async React Server Components and Suspense
React Server Components promise a lightning-fast web. And they are, so long as you use them properly.
A lot has changed in the last few years when it comes to implementing applications using JavaScript. Node JS has revolutionized how many of us create backend apps, React has become a widely-used standard for creating the frontend, and ES6 has come along and completely transformed JavaScript itself, largely for the better.
All of this brings new capabilities and opportunities, but also new challenges when it comes to figuring out what's worth paying attention to, and how to learn it. Today we'll look at how to set up my personal take on a sensible stack in this new world, starting from scratch and building it up as we go. We'll focus on getting to the point where everything is set up and ready for you to create the app.
The stack we'll be setting up today is as follows:
Although we won't be setting up a Node JS server in this article, we'll use npm to put everything else in place, so adding a Node JS server using Express or any other backend framework is trivial. We're also going to omit setting up a testing infrastructure in this post - this will be the subject of the next article.
If you want to get straight in without reading all the verbiage, you can clone this github repo that contains all of the files we're about to create.
The only prerequisite here is that your system has Node JS already installed. If that isn't the case, go install it now from http://nodejs.org. Once you have Node, we'll start by creating a new directory for our project and setting up NPM:
The npm init command takes you through a short series of prompts asking for information about your new project - author name, description, etc. Most of this doesn't really matter at this stage - you can easily change it later. Once that's done you'll find a new file called package.json in your project directory.
Before we take a look at this file, we already know that we need to bring in some dependencies, so we'll do that now with the following terminal commands:
Note that for the react dependency we use --save, whereas for webpack we use --save-dev. This indicates that react is required when running our app in production, whereas webpack is only needed while developing (as once webpack has created your production build, its role is finished). Opening our package.json file now yields this:
This is pretty straightforward. Note the separate dependencies and devDependencies objects in line with our --save vs --save-dev above. Depending on when you created your app the version numbers for the dependencies will be different, but the overall shape should be the same.
We're not done installing npm packages yet, but before we get started with React and ES6 we're going to get set up with Webpack.
We'll be using Webpack to turn our many application files into a single file that can be loaded into the browser. As it stands, though, we don't have any application files at all. So let's start by creating those:
Now we have a src directory with two empty files. Into App.js, we'll place the following trivial component rendering code:
All we're doing here is returning an HTML string when you call the App function. Once we bring React into the picture we'll change the approach a little, but this is good enough for now. Into our src/index.js, we'll use:
So we're simply importing our App, running it and then writing the resulting HTML string into the DOM. Webpack will be responsible for figuring out how to combine index.js and App.js and building them into a single file. In order to use Webpack, we'll create a new file called webpack.config.js (in the root directory of our project) with the following contents:
This really couldn't be much simpler - it's just saying take the entry point (our src/index.js file) as input, and save the output into a file called bundle.js. Webpack takes those entry file inputs, figures out all of the require('...') statements and fetches all of the dependencies as required, outputting our bundle.js file.
To run Webpack, we simply use the webpack command in our terminal, which will do something like this:
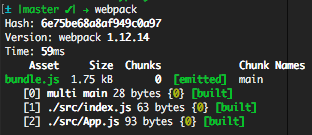
As we can see, we now have a 1.75kb file called bundle.js that we can serve up in our project. That's a little heavier than our index.js and App.js files combined, because there is a little Webpack plumbing that gets included into the file too.
Now finally we'll create a very simple index.html file that loads our bundle.js and renders our app:
Can't get much simpler than that. We don't have a web server set up yet, but we don't actually need one. As we have no backend we can just load the index.html file directly into the browser, either by dragging it in from your OS's file explorer program, or entering the address manually. For me, I can enter file:///Users/ed/Code/myproject/index.html into my browser's address bar, and be greeted with the following:

Great! That's our component being rendered and output into the DOM as desired. Now we're ready to move onto using React and ES6.
React can be used either with or without ES6. Because this is the future, we desire to use the capabilities of ES6, but we can't do that directly because most browsers currently don't support it. This is where babel comes in.
Babel (which you'll often hear pronounced "babble" instead of the traditional "baybel") a transpiler, which takes one version of the JavaScript language and translates it into another. In our case, it will be translating the ES6 version of JavaScript into an earlier version that is guaranteed to run in browsers. We'll start by adding a few new npm package dependencies:
This is quite a substantial number of new dependencies. Because babel can convert between many different flavors of JS, once we've specified the babel-core and babel-loader packages, we also need to specify babel-preset-es2015 to enable ES6 support, and babel-preset-react to enable React's JSX syntax. We also bring in a polyfill that makes available new APIs like Object.assign that babel would not usually bring to the browser as it requires some manipulation of the browser APIs, which is something one has to opt in to.
Once we have these all installed, however, we're ready to go. The first thing we'll need to do is update our webpack.config.js file to enable babel support:
Hopefully the above is clear enough - it's the same as last time, with the exception of the new module object, which contains a loader configuration that we've configured to convert any file that ends in .js or .jsx in our src directory into browser-executable JavaScript.
Next we'll update our App.js to look like this:
Cool - new syntax! We've switched from require('') to import, though this does essentially the same thing. We've also switched from module.exports = to export default , which is again doing the same thing (though we can export multiple things this way).
We're also using the ES6 class syntax, in this case creating a class called App that extends React's Component class. It only implements a single method - render - which returns a very similar HTML string to our earlier component, but this time using inline JSX syntax instead of just returning a string.
Now all that remains is to update our index.js file to use the new Component:
Again we're using the import syntax to our advantage here, and this time we're using ReactDOM.render instead of document.write to place the rendered HTML into the DOM. Once we run the webpack command again and refresh our browser window, we'll see a screen like this:

We'll round out by doing a few small things to improve our workflow. First off, it's annoying to have to switch back to the terminal to run webpack every time we change any code, so let's update our webpack.config.js with a few new options:
Now we just run webpack once and it'll stay running, rebuilding whenever we save changes to our source files. This is generally much faster - on my 2 year old MacBook Air it takes about 5 seconds to run webpack a single time, but when using watch mode each successive build is on the order of 100ms. Usually this means that I can save my change in my text editor, and by the time I've switched to the browser the new bundle.js has already been created so I can immediately refresh to see the results of my changes.
The last thing we'll do is add a second React component to be consumed by the first. This one we'll call src/Paragraph.js, and it contains the following:
This is almost identical to our App, with a couple of small tweaks. First, notice that we've moved the export default inline with the class declaration to save on space, and then secondly this time we're using {this.props} to access a configured property of the Paragraph component. Now, to use the new component we'll update App.js to look like the following:
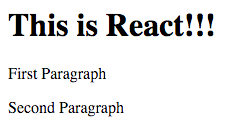
Again a few small changes here. First, note that we're now importing the Paragraph component and then using it twice in our render() function - each time with a different text property, which is what is read by {this.props.text} in the Paragraph component itself. Finally, React requires that we return a single root element for each rendered Component, so we wrap our <h1> and <Paragraph> tags into an enclosing <div>
By the time you hit save on those changes, webpack should already have built a new bundle.js for you, so head back to your browser, hit refresh and you'll see this:
That's about as far as we'll take things today. The purpose of this article was to get you to a point where you can start building a React application, instead of figuring out how to set up all the prerequisite plumbing; hopefully it's clear enough how to continue from here.
You can find a starter repository containing all of the above over on GitHub. Feel free to clone it as the starting point for your own project, or just look through it to see how things fit together.
In the next article, we'll look at how to add some unit testing to our project so that we can make sure our Components are behaving as they should. Until then, happy Reacting!
After learning about setting up a modern JavaScript stack with React, ES6, and Webpack, consider exploring the integration of asynchronous React Server Components and Suspense to optimize performance and user experience. Additionally, delving into Blending Markdown and React components in NextJS can provide insights on enhancing content creation with the power of React and MDX.
React Server Components promise a lightning-fast web. And they are, so long as you use them properly.
Markdown is a really nice way to write content like blog posts and other long-form content, with live components inside
On January 1st 2010 I officially joined Ext JS to take over the role of lead developer. After livin
I have an article on Behaviour Driven Development for JavaScript in June's edition of the excellent
herdctl runs Claude Code agents securely in Docker, with schedules and chat
Learn moreAI-powered work documentation for career advancement
Start free demoherdctl runs Claude Code agents securely in docker, with optional schedules and chat
→ Read moremdx-prompt lets you write reusable and composable LLM prompts using JSX
→ Read morebragdoc.ai is an open source Next JS AI SaaS app for tracking your work
→ Read morereact-auto-intl automatically internationalizes and translates React and Next JS apps
→ Read moreNarratorAI creates AI-powered content like intros and search result summaries
→ Read moreInformAI allows AI to access and understand the information in your React components
→ Read moreReadNext creates AI-powered content recommendations for your blog or other content
→ Read moreI've built things on the web for 20 years, and used JavaScript before it was cool.
I've been working for myself since early 2023, going wherever my heart takes me - mostly playing with AI and UI.