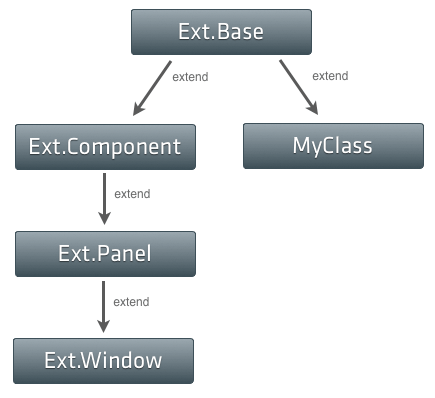
Classes in Ext JS 4: Under the hood
Last week we unveiled a the brand new class system coming in Ext JS 4. If you haven’t seen the new s
Sencha Touch 1 used the class system from Ext JS 3, which provides a simple but powerful inheritance system that makes it easier to write big complex things like applications and frameworks.
With Sencha Touch 2 we've taken Ext JS 4's much more advanced class system and used it to create a leaner, cleaner and more beautiful framework. This post takes you through what has changed and how to use it to improve your apps.
The first thing you'll notice when comparing code from 1.x and 2.x is that the class syntax is different. Back in 1.x we would define a class like this:
This would create a subclass of Ext.Panel called MyApp.CustomPanel, setting the html configuration to 'Some html'. Any time we create a new instance of our subclass (by calling new MyApp.CustomPanel()), we'll now get a slightly customized Ext.Panel instance.
Now let's see how the same class is defined in Sencha Touch 2:
There are a few changes here, let's go through them one by one. Firstly and most obviously we've swapped out Ext.extend for Ext.define. Ext.define operates using strings - notice that both 'MyApp.CustomPanel' and 'Ext.Panel' are now wrapped in quotes. This enables one of the most powerful parts of the new class system - dynamic loading.
I actually talked about this in a post about Ext JS 4 last year so if you're not familiar you should check out the post, but in a nutshell Sencha Touch 2 will automatically ensure that the class you're extending (Ext.Panel) is loaded on the page, fetching it from your server if necessary. This makes development easier and enables you to create custom builds that only contain the class your app actually uses.
The second notable change is that we're using a 'config' block now. Configs are a special thing in Sencha Touch 2 - they are properties of a class that can be retrieved and updated at any time, and provide extremely useful hook functions that enable you to run any custom logic you like whenever one of them is changed.
Whenever you want to customize any of the configurations of a subclass in Sencha Touch 2, just place them in the config block and the framework takes care of the rest, as we'll see in a moment.
The biggest improvement that comes from the config system is consistency. Let's take our MyApp.CustomPanel class above and create an instance of it:
Every configuration has an automatically generated getter and setter function, which we can use like this:
This might not seem much, but the convention applies to every single configuration in the entire framework. This eliminates the guesswork from the API - if you know the config name, you know how to get it and update it. Contrast this with Sencha Touch 1 where retrieving the html config meant finding some property on the instance, and updating it meant calling myPanel.update('New HTML'), which is nowhere near as predictable.
You probably noticed that we used a new function above - Ext.create. This is very similar to just calling 'new MyApp.CustomPanel()', with the exception that Ext.create uses the dynamic loading system to automatically load the class you are trying to instantiate if it is not already on the page. This can make life much easier when developing your app as you don't have to immediately manage dependencies - it just works.
In the example above we just instantiated a default MyApp.CustomPanel but of course we can customize it at instantiation time by passing configs into Ext.create:
We can still call getHtml() and setHtml() to retrieve and update our html config at any time.
We created a simple subclass above that provided a new default value for Ext.Panel's html config. However, we can also add our own configs to our subclasses:
The 'anotherConfig' configuration doesn't exist on Ext.Panel so it's defined for the first time on MyApp.CustomPanel. This automatically creates our getter and setter functions for us:
Notice how the getter and setter names were automatically capitalized to use camelCase like all of the other functions in the framework. This was done automatically, but Sencha Touch 2 does another couple of very nice things for you - it creates hook functions:
We've added two new functions to our class - applyAnotherConfig and updateAnotherConfig - these are both called when we call setAnotherConfig. The first one that is called is applyAnotherConfig. This is passed the value of the configuration ('default value' by default in this case) and is given the opportunity to modify it. In this case we're prepending "[TEST] " to whatever anotherConfig is set to:
The second function, updateAnotherConfig, is called after applyAnotherConfig has had a chance to modify the value and is usually used to effect some other change - whether it's updating the DOM, sending an AJAX request, or setting another config as we do here.
When we run the code above, as well as '[TEST] ' being prepended to our anotherConfig configuration, we're calling this.setHtml to update the html configuration too. There's no limit to what you can do inside these hook functions, just remember the rule - the apply functions are used to transform new values before they are saved, the update functions are used to perform the actual side-effects of changing the value (e.g. updating the DOM or configuring other classes).
The example above is a little contrived to show the point - let's look at a real example from Sencha Touch 2's Ext.Panel class:
Here we see the apply and update functions for the bodyPadding config. Notice that in the applyBodyPadding function we set a default and use the framework's unitizeBox function to parse CSS padding strings (like '5px 5px 10px 15px') into top, left, bottom and right paddings, which we then return as the transformed value.
The updateBodyPadding then takes this modified value and performs the actual updates - in this case setting the padding style on the Panel's element based on the new configuration. You can see similar usage in almost any component class in the framework.
This is just a look through the most important aspects of the new class system and how they impact you when writing apps in Sencha Touch 2. To find out more about the class system we recommend taking a look at the Class System guide and if you have any questions the forums are a great place to start.
To further understand the class systems in Sencha frameworks, you might find the detailed exploration in Classes in Ext JS 4: Under the hood enlightening, as it breaks down dynamic loading and mixins. Additionally, gain insights into mobile development advancements with Sencha Touch 2 - Thoughts from the Trenches and Anatomy of a Sencha Touch 2 App, which provide practical perspectives on performance and application structure.
Last week we unveiled a the brand new class system coming in Ext JS 4. If you haven’t seen the new s

As you may have seen, we put out the first public preview release of Sencha Touch 2 today. It only w
Earlier today we released Sencha Touch 2 Beta 1 - check out the official sencha.com blog post and re
The last few months have flown by faster than almost any before them. The first Sencha Touch 2 relea
herdctl runs Claude Code agents securely in Docker, with schedules and chat
Learn moreTrack achievements automatically - boost your performance reviews
Try demo modeherdctl runs Claude Code agents securely in docker, with optional schedules and chat
→ Read moremdx-prompt lets you write reusable and composable LLM prompts using JSX
→ Read morebragdoc.ai is an open source Next JS AI SaaS app for tracking your work
→ Read morereact-auto-intl automatically internationalizes and translates React and Next JS apps
→ Read moreNarratorAI creates AI-powered content like intros and search result summaries
→ Read moreInformAI allows AI to access and understand the information in your React components
→ Read moreReadNext creates AI-powered content recommendations for your blog or other content
→ Read moreI've built things on the web for 20 years, and used JavaScript before it was cool.
I've been working for myself since early 2023, going wherever my heart takes me - mostly playing with AI and UI.