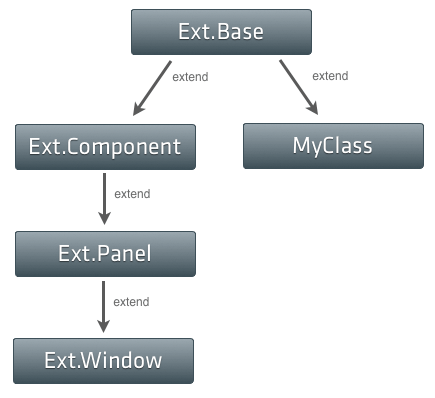
ExtJS has several built-in Container classes - classes which can contain one or more other Ext.Components (such as Grids, Forms, other Panels, etc). The most obvious example of a Container is the Ext.Panel class, along with its subclasses such as Ext.TabPanel, Ext.form.FormPanel and Ext.Window. With each container class you can add a bunch of components, like this:
//a child component to be added to the container below
var myComponent = new Ext.Panel({html: 'component 1'});

//Ext.Panel is a subclass of Ext.Container
var myPanel = new Ext.Panel({
  items: [
    myComponent,
    {html: 'component 2'},
    {html: 'component 3'}
  ]
});
//a child component to be added to the container below
var myComponent = new Ext.Panel({html: 'component 1'});

//Ext.Panel is a subclass of Ext.Container
var myPanel = new Ext.Panel({
  items: [
    myComponent,
    {html: 'component 2'},
    {html: 'component 3'}
  ]
});
Which will just create a Panel with three other Panels as its child components ('panel' is the default xtype, so we don't have to specify it). More to the point, you can add and remove components from the Container like this:
myPanel.add({html: 'component 4'});
myPanel.remove(myComponent);
myPanel.add({html: 'component 4'});
myPanel.remove(myComponent);
As myPanel is an Ext.Container subclass, the methods add() and remove() automatically add or remove child components from within the Container, and take care of any rendering that needs to be performed. Most of the time this is great, but what if you want to write your own custom Container? Say you had a bunch of shortcut links which performed some action in your application, and for styling or other reasons you want to put them into markup like this:
<div class="x-shortcuts-wrapper">
  <div class="x-shortcuts-header"></div>
  <div class="x-shortcuts">
    <!-- child components to go here -->
  </div>
  <div class="x-shortcuts-footer"></div>
  <button class="x-shortcuts-add">Add</button>
</div>
<div class="x-shortcuts-wrapper">
  <div class="x-shortcuts-header"></div>
  <div class="x-shortcuts">
    <!-- child components to go here -->
  </div>
  <div class="x-shortcuts-footer"></div>
  <button class="x-shortcuts-add">Add</button>
</div>
You might write something like this:
Ext.ns('MyApp');
/**
 * @class MyApp.Shortcuts
 * @extends Ext.Container
 * Container for application shortcuts
 */
MyApp.Shortcuts = Ext.extend(Ext.Container, {
  /**
   * Creates the HTML markup for the shortcuts container
   * @param {Ext.Container} ct The container into which this container will be rendered
   */
  onRender: function(ct) {
    this.el = ct.createChild({
      cls: 'x-shortcuts-wrapper',
      children: [
        {cls: 'x-shortcuts-header'},
        {cls: 'x-shortcuts'},
        {cls: 'x-shortcuts-footer'},
        {cls: 'x-shortcuts-add', tag: 'button'}
      ]
    });

    MyApp.Shortcuts.superclass.onRender.apply(this, arguments);

    this.shortcutsHolder = this.el.child('.x-shortcuts');
  },

  //tells the container which element to add child components into
  getLayoutTarget: function() {
    return this.shortcutsHolder;
  }
});
So our onRender method is responsible for creating some markup, which must be assigned to this.el. We're also calling the onRender() function of the superclass (Ext.Container) to make sure nothing is missed out.
The critical elements here are the getLayoutTarget() function, and the last line on onRender(). Usually when you subclass Ext.Container, the add() and remove() functions add and remove from this.el, which would result in something like this:
<div class="x-shortcuts-wrapper">
  <div class="x-shortcuts-header"></div>
  <div class="x-shortcuts"></div>
  <div class="x-shortcuts-footer"></div>
  <button class="x-shortcuts-add">Add</button>
  <!-- child components will end up here -->
</div>
<div class="x-shortcuts-wrapper">
  <div class="x-shortcuts-header"></div>
  <div class="x-shortcuts"></div>
  <div class="x-shortcuts-footer"></div>
  <button class="x-shortcuts-add">Add</button>
  <!-- child components will end up here -->
</div>
To prevent this from happening, we obtain a reference to the element we want components to actually be rendered to, and return that with getLayoutTarget(). After that the Container will once again do your bidding.
As of the time of writing getLayoutTarget() is not to be found anywhere in the Ext documentation (version 2.2), so my thanks go to Condor and Animal for answering my question on the ExtJS forum thread.
To round off the example, say your Shortcut class looked something like this:
/**
 * @class MyApp.Shortcut
 * @extends Ext.Component
 * Clickable shortcut class which renders some HTML for a standard application shortcut
 */
MyApp.Shortcut = function(config) {
  var config = config || {};

  //apply some defaults
  Ext.applyIf(config, {
    text: 'Shortcut Name',
    icon: 'default_shortcut.gif'
  });

  //call the superclass constructor
  MyApp.Shortcut.superclass.constructor.call(this, config);
};
Ext.extend(MyApp.Shortcut, Ext.Component, {
  onRender: function(ct) {
    this.el = ct.createChild({
      cls: 'x-shortcut',
      children: [
        {
          tag: 'img',
          src: this.initialConfig.icon
        },
        {
          tag:  'span',
          html: this.initialConfig.text
        }
      ]
    });

    MyApp.Shortcut.superclass.onRender.apply(this, arguments);
  }
});

Ext.reg('shortcut', MyApp.Shortcut);
Then our container would be created like this:
new MyApp.Shortcuts({
  items: [
    new MyApp.Shortcut({text: 'Shortcut 1', icon: 'shatner.gif'}),
    {xtype: 'shortcut', text: 'Shortcut 2', icon: 'nimoy.gif'},
    {xtype: 'shortcut'}
  ]
});
new MyApp.Shortcuts({
  items: [
    new MyApp.Shortcut({text: 'Shortcut 1', icon: 'shatner.gif'}),
    {xtype: 'shortcut', text: 'Shortcut 2', icon: 'nimoy.gif'},
    {xtype: 'shortcut'}
  ]
});
Which would produce HTML like this:
<div class="x-shortcuts-wrapper">
  <div class="x-shortcuts-header"></div>
  <div class="x-shortcuts">
    <div class="x-shortcut">
      <img src="shatner.gif" />
      <span>Shortcut 1</span>
    </div>
    <div class="x-shortcut">
      <img src="nimoy.gif" />
      <span>Shortcut 2</span>
    </div>
    <div class="x-shortcut">
      <img src="default_shortcut.gif" />
      <span>Shortcut Name</span>
    </div>
  </div>
  <div class="x-shortcuts-footer"></div>
  <button class="x-shortcuts-add">Add</button>
</div>